
How to Manage Open Source & Closed Source Code in One Android Project Using Multi-Modules & Git Submodules
Many Android developers eventually face the same architectural challenge. On one side, there is the desire to build in public, accept contributions, and grow a real community around an app. On the other side, there are premium features that generate revenue and must remain private.
A common reaction is to split everything into two completely separate projects one public and one private. It seems clean at first. Over time, it becomes difficult to maintain. Shared logic gets duplicated. Bug fixes must be applied twice. Features drift apart. Maintenance slowly turns into overhead.
There is a more sustainable approach. The professional solution is a single Android project with a strict boundary between public and private code, enforced at the repository level.
This article explains how to achieve that using Android multi-module architecture combined with Git submodules.
Why the Naive Approaches Fail
Keeping premium code inside a public repository and relying on build flags or Gradle conditions does not protect source code. Once committed to a public repository, the code is exposed. Compilation control is not security.
Maintaining two fully separate Android projects creates long-term complexity. Shared models, utilities, base classes, and business logic must stay synchronized. As the application grows, duplication increases and coordination becomes harder.
The correct mental model is straightforward: One project. One architecture. A hard boundary at the repository level.
The Architecture
The project structure looks like this:
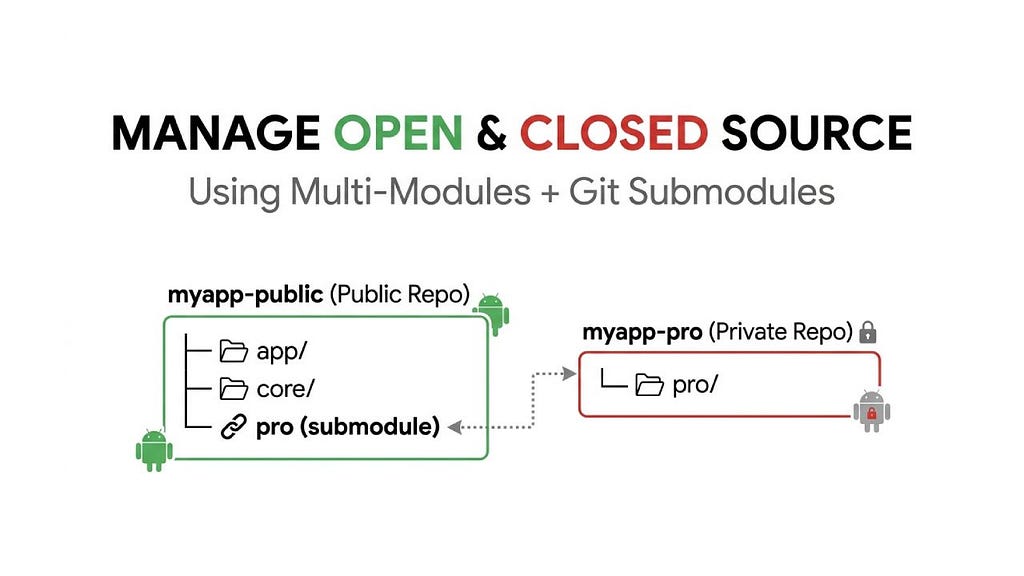
myapp-public/ ← public GitHub repository
├── app/ ← the main application module
├── core/ ← shared utilities, models, base classes
├── pro/ ← git submodule pointing to private repo
├── .gitmodules
└── build.gradle.kts
myapp-pro/             ← separate private GitHub repository
├── src/
│   └── main/java/com/example/myapp/pro/
│       └── ProFeature.kt
└── build.gradle.kts
The key detail is that the pro folder inside the public repository does not contain actual premium source code. Instead, it stores a reference to a specific commit in another repository. Without access to the private repository, the submodule cannot be initialized. This creates a real boundary enforced by Git itself.
Step 1: Set Up the Android Project with Modules
Create a new Android project in Android Studio. Once it is created, add two modules:
core — for shared logic that both free and pro features depend on. Create this via File > New > New Module > Android Library, named core.
pro — for premium features. Same process, named pro.
settings.gradle.kts should now include all three:
include(":app")
include(":core")
include(":pro")
In app/build.gradle.kts, declare dependencies on both:
dependencies {
    implementation(project(":core"))
    implementation(project(":pro"))
}
The pro module should also depend on core, not on app. Keep the dependency graph acyclic and unidirectional: app depends on pro and core, pro depends on core, core depends on nothing internal.
In pro/build.gradle.kts declare dependency
dependencies {
    implementation(project(":core"))
}
Step 2: Define a Public Interface for Pro Features
In core module, define an interface for premium functionality.
// core/src/main/java/com/example/myapp/core/ProGate.kt
interface ProGate {
    fun getPremiumGreeting(): String
    fun isPremiumUnlocked(): Boolean
}
In pro module, implement it:
// pro/src/main/java/com/example/myapp/pro/ProFeature.kt
class ProFeature : ProGate {
    override fun getPremiumGreeting() = "Welcome to the premium experience."
    override fun isPremiumUnlocked() = true
}
In app module, inject ProGate rather than depending directly on ProFeature. This means the public codebase compiles cleanly even without the pro submodule initialized, as long as provide a stub implementation. This is important for open-source contributors who will not have access to the private repo.
Create a stub in app or core:
class ProStub : ProGate {
    override fun getPremiumGreeting() = "Upgrade to unlock this feature."
    override fun isPremiumUnlocked() = false
}
Use a Gradle flag to switch between real and stub:
// app/build.gradle.kts
val hasProModule = file("../pro/build.gradle.kts").exists()

dependencies {
    implementation(project(":core"))
    if (hasProModule) {
        implementation(project(":pro"))
    }
}
With this setup, the project compiles and runs even when the private submodule is unavailable. Open-source contributors can build, run, and contribute to the app without access to premium code.
Step 3: Initialize the Public Repository
With the project structure working locally, create the public GitHub repository. Before pushing, ensure the pro directory is empty or removed we will re-attach it as a submodule in the next step. Add a .gitignore if needed to exclude any locally compiled pro artifacts.
git init
git branch -M main
git remote add origin git@github.com:yourusername/myapp-public.git
git add .
git commit -m "Initial project structure"
git push -u origin main
Step 4: Initialize the Private Repository
Take the contents of your pro module and push them to a new private repository.
cd /path/to/pro-module-contents
git init
git branch -M main
git remote add origin git@github.com:yourusername/myapp-pro.git
git add .
git commit -m "Initial pro module"
git push -u origin main
Step 5: Link the Private Repo as a Git Submodule
Back in your public project root, remove the local pro directory and add it back as a submodule:
rm -rf pro
git submodule add git@github.com:yourusername/myapp-pro.git pro
git add .gitmodules pro
git commit -m "Link pro module as private submodule"
git push
```

Git will create a `.gitmodules` file that looks like this:
```
[submodule "pro"]    path = pro
    url = git@github.com:yourusername/myapp-pro.git
The public repo now stores only a commit hash reference to the private repo no source code leaks.
Step 6: Cloning the Full Project
A standard git clone of the public repo will leave the pro folder empty. To initialize submodules:
git clone --recurse-submodules git@github.com:yourusername/myapp-public.git
Or if you already cloned without it:
git submodule update --init --recursive
Step 7: Keeping Everything in Sync
When you make changes to the pro module, work inside the pro directory as if it were its own repository:
cd pro
# make changes
git add .
git commit -m "Add new premium feature"
git push origin main
Then update the public project to point to the new commit:
cd ..   # back to project root
git add pro
git commit -m "Update pro submodule to latest"
git push
The public repo’s submodule pointer is now updated. Other developers with access clone and run git submodule update –remote to pull the latest.
Final Thoughts
Open-source development and commercial sustainability do not have to compete with each other. The difference lies in structure and discipline.
When premium logic is separated through clear abstractions and repository-level boundaries, public collaboration becomes safe and practical. Contributors can work freely within the open modules, while revenue-generating features remain protected.
The result is a single, coherent architecture that supports both community growth and long-term business stability.
How to Manage Open Source & Closed Source Code in One Android Project Using Multi-Modules & Git… was originally published in ProAndroidDev on Medium, where people are continuing the conversation by highlighting and responding to this story.


This Post Has 0 Comments