
A Senior Engineer’s Take — Why “more control” is often the wrong goal for login.
Overview
When Android teams make login flows, WebView is often the quickest way to do it. You can put the page inside another page, add JavaScript, get messages, and close the screen whenever you want. That sounds like a good plan. But when the auth issue turns into SSO, OAuth, enterprise identity, or browser-based login, that ease can turn into architectural debt.
We will try to compare two approaches:
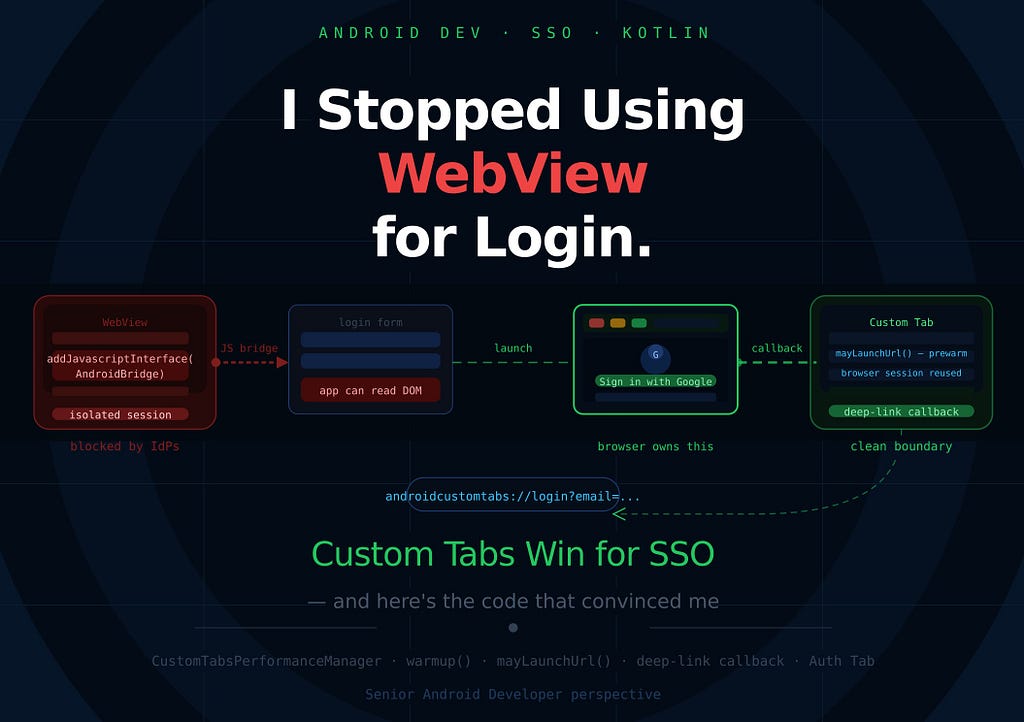
• WebView (WebView + JS Bridge) login, where the Android app injects a JavaScript bridge and directly receives page events
• Custom Tabs (Custom Tabs + deep-link callback) login, where the browser owns the auth flow and returns control through a deep-link callback
The key argument is simple:
For real SSO, the app should control the flow, not the login page.

Table of Contents
- Why Custom Tabs matter?
- What this codebase implements
- Simple Web Server SSO Implementation(NodeJS)
- Android WebView Integration in This Project
- Custom Tabs Integration Setup
- Custom Tabs Integration in This Project
- Security and SSO implications
- Conclusion
1. Why Custom Tabs matter?
Most teams don’t choose WebView because it’s the most accurate auth boundary. They choose it because they know it.
The issue is that logging in through a browser is not the same as having web content owned by an app, and control is not the best thing to optimize for in authentication.
When the login flow includes these:
- shared browser cookies
- Google / Microsoft / Okta / Auth0 style login
- redirects across multiple domains
- enterprise SSO
- password manager autofill
- device/browser trust assumptions
…then the browser is no longer just a renderer. It is part of the model for security.
When a user logs into an app through a WebView, the login happens in a sandboxed renderer that is completely separate from the user’s real browser. That means their passwords that they saved aren’t there. Their cookies from the last time they logged into the same IdP are missing. There are no biometric autofill shortcuts for them. The account chooser that Google and other identity providers use doesn’t show up on its own. You want the user to sign in from scratch, in a container where they can’t see the address bar, and they can’t get to any of the credentials they already set up.
Custom Tabs takes care of all of this. It opens the login page in the user’s real browser, no matter what it is, and everything they have already set up in that browser comes with it. The whole thing, like a shared cookie jar, saved passwords, autofill, and account chooser. When the login is done, the browser goes to a custom URI scheme that Android catches, and the app gets the result through a clean deep-link callback.
That’s where Custom Tabs really shines.
2. What This Codebase Implements
This repository uses the same local web app for both flows so the comparison is fair.
Android side
The Android app uses Jetpack Compose and exposes two entry points:

- Login with WebView
- Login with Custom Tabs
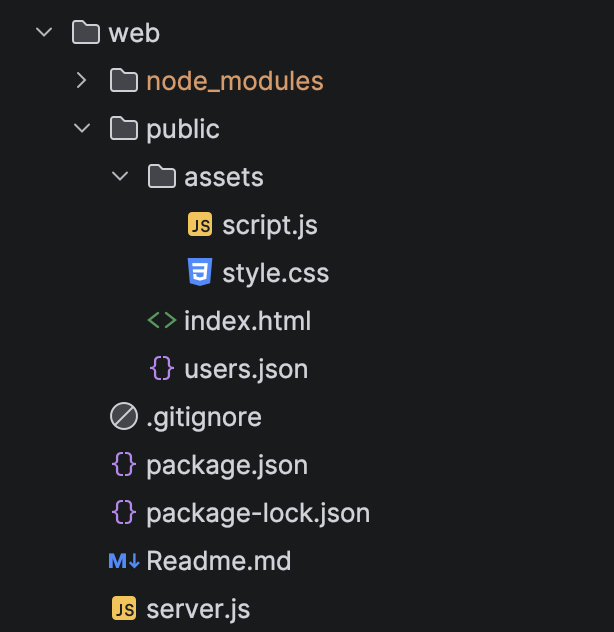
Web side
The local web app is served from Express and contains:
- Authentication with local session storage
- Android bridge integration for WebView
- Deeplink Redirect back to Android for Custom Tabs
3. Simple Web Server SSO Implementation(NodeJS)
The fact that the web side is real and not fake or abstract is one thing that makes this demo useful. It has a real local implementation that works with both Android paths.
Express server
The backend is intentionally minimal. It serves the login page and exposes a simple users endpoint:
// server.js
const express = require('express');
const fs = require('fs');
const path = require('path');
const cors = require('cors');
const app = express();
const PORT = 3000;
const PUBLIC_DIR = path.join(__dirname, 'public');
const USERS_FILE = path.join(PUBLIC_DIR, 'users.json');
app.use(cors());
app.use(express.json());
app.use('/static', express.static(PUBLIC_DIR));
app.use(express.static(PUBLIC_DIR));
app.get('/api/users', (req, res) => {
  const users = JSON.parse(fs.readFileSync(USERS_FILE, 'utf8'));
  res.json(users.map(({ password, ...user }) => user));
});
app.listen(PORT, () => {
  console.log(`Backend running at http://localhost:${PORT}`);
});
This server is enough for local Android testing because the app just needs:
- a login page
- a stable callback-capable URL
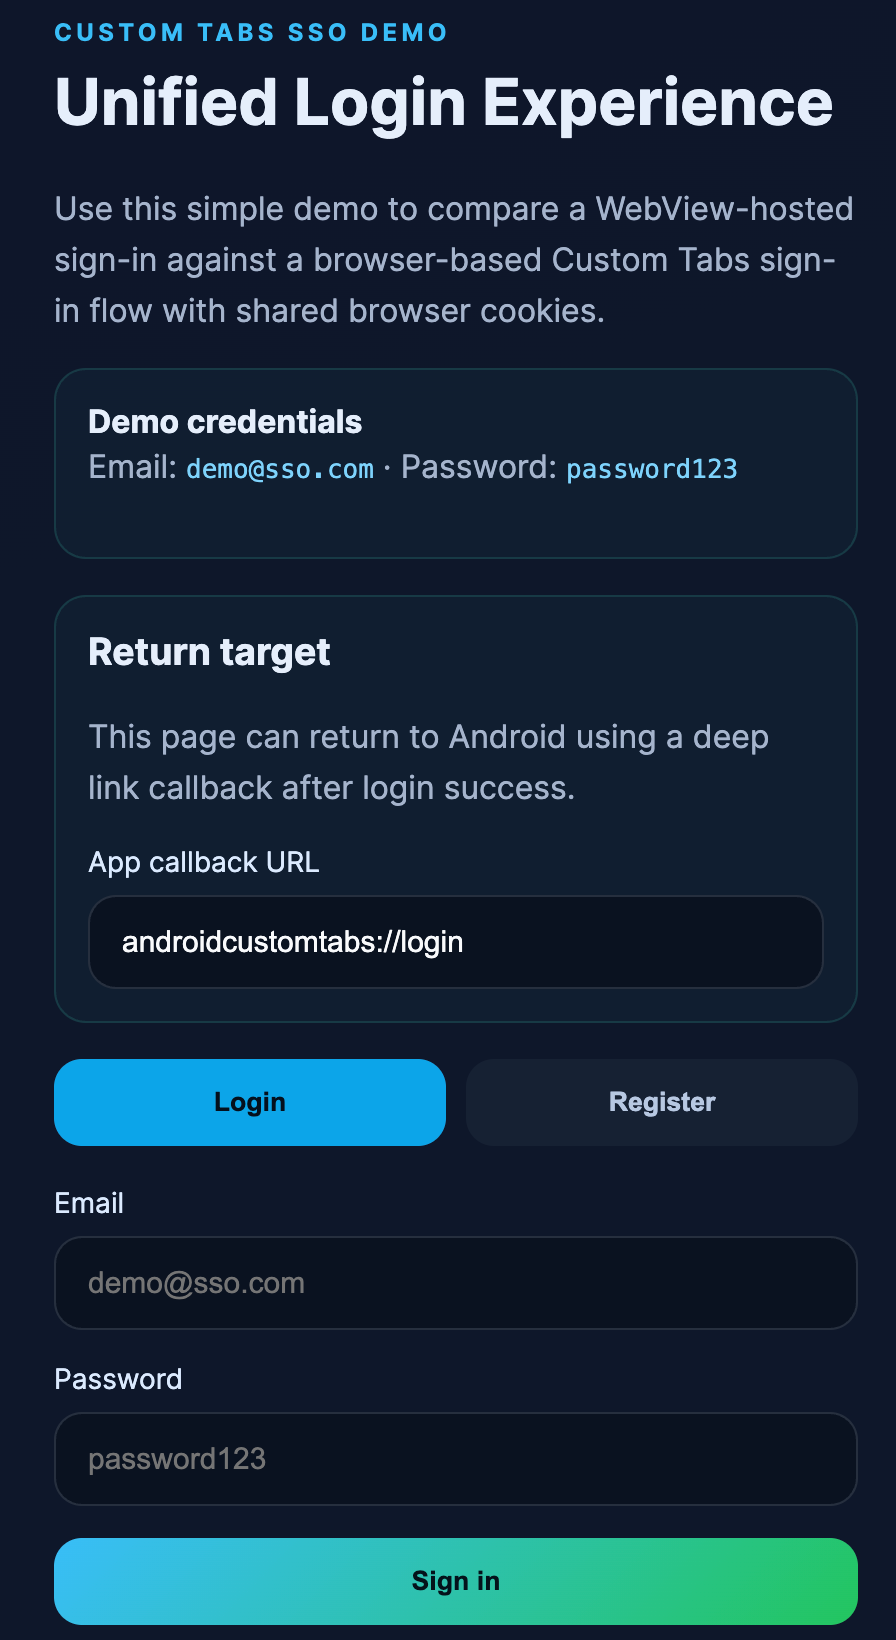
The login page structure
The HTML is designed to support both login and return-to-app behavior via index.html:
<form id="auth-form" class="auth-form">
  <button id="submit-button" class="primary-action" type="submit">Sign in</button>
</form>

<div class="session-actions">
  <button id="send-session" class="secondary-action" type="button">Send session to Android</button>
  <button id="return-to-app" class="secondary-action" type="button">Return to app</button>
  <button id="logout" class="ghost-action" type="button">Logout</button>
</div>
<section class="bridge-card">
  <h3>Android bridge</h3>
  <div class="bridge-actions">
    <button id="ping-native" class="secondary-action" type="button">Ping Native Bridge</button>
    <button id="close-webview" class="ghost-action" type="button">Close WebView</button>
  </div>
  <p class="bridge-note">
    In WebView, JavaScript talks to Android through <code>AndroidBridge</code>. In Custom Tabs,
    success should redirect to the app callback URL instead of relying on direct JS control.
  </p>
</section>
And the session actions make the behavior explicit via script.js:
function bindEvents() {
  elements.authForm.addEventListener('submit', onSubmit);
  elements.sendSession.addEventListener('click', () => pushSessionToAndroid('manualShare'));
  elements.returnToApp.addEventListener('click', () => redirectToApp('manualRedirect'));
  elements.logout.addEventListener('click', logout);
  elements.pingNative.addEventListener('click', () => {
    notifyBridge('ping', { message: 'Ping from web page' });
    setStatus('Pinged Android bridge from JavaScript.');
  });
  elements.closeWebView.addEventListener('click', () => closeNativeWebView());
  elements.callbackUrl.addEventListener('change', getCallbackUrl());
}
// will be used as deep link sharing success via custom tabs
function getCallbackUrl() {
  return ('androidcustomtabs://login').trim();
}
function redirectToApp(source) {
  if (!state.session) {
    setStatus('No active session to return to app.');
    return;
  }
  const callbackUrl = getCallbackUrl();
  const target = new URL(callbackUrl);
  target.searchParams.set('email', state.session.email);
  target.searchParams.set('name', state.session.name);
  target.searchParams.set('source', source || state.session.source || 'custom-tabs');
  target.searchParams.set('transport', 'deep-link');
  window.location.href = target.toString();
}
function logout() {
  state.session = null;
  localStorage.removeItem(storageKeys.session);
  render();
  notifyBridge('logout', { loggedOut: true });
}
function isAndroidBridgeAvailable() {
  return Boolean(window.AndroidBridge);
}
function persistUsers() {
  localStorage.setItem(storageKeys.users, JSON.stringify(state.users));
}
function notifyBridge(eventName, payload) {
  const message = JSON.stringify({ event: eventName, payload });
  if (window.AndroidBridge?.postMessage) {
    window.AndroidBridge.postMessage(message);
    return;
  }
  console.log('Bridge unavailable:', message);
}
function closeNativeWebView() {
  if (window.AndroidBridge?.closeWebView) {
    window.AndroidBridge.closeWebView();
  } else {
    setStatus('Close action is only available inside Android WebView.');
  }
}
// When inside WebView — direct bridge call
AndroidBridge.postMessage(JSON.stringify({ event: 'loginSuccess', payload }));

// When inside Custom Tabs - browser navigates away to the app's deep-link scheme
window.location.href = `androidcustomtabs://login?email=...&name=...`;
This whole article is about those two lines. One way is for JavaScript to talk to native code. The other is when the browser goes to a URI that Android owns. The difference in architecture is what decides which auth model you are building.
This is important because the page is more than just a form. It is a controlled demo surface that can act like :
- a WebView-integrated page with web bridge
- and a browser-auth page that deep-links back into Android
4. Android WebView Integration in This Project
WebView is the “high-control” model.
AndroidView(
                factory = { _ ->
                    webView.apply {
                        val webViewRef = this
                        addJavascriptInterface(
                            AndroidBridge(
                                onMessage = { message -> post { handleBridgeMessage(message) } },
                                onClose = { post { onBack() } }
                            ),
                            "AndroidBridge"
                        )

                        CookieManager.getInstance().apply {
                            setAcceptCookie(true)
                            setAcceptThirdPartyCookies(webViewRef, true)
                        }
                        settings.apply{
                            javaScriptEnabled = true
                            domStorageEnabled = true
                            cacheMode = WebSettings.LOAD_DEFAULT
                        }

                        if (webViewState.bundle != null) {
                            restoreState(webViewState.bundle!!)
                        } else {
                            loadUrl(url)
                        }
                    }
                }
            )
That makes JavaScript inside the page able to call:
- window.AndroidBridge.postMessage(…)
- window.AndroidBridge.closeWebView()
The bridge definition is straightforward:
private class AndroidBridge(
    private val onMessage: (String) -> Unit,
    private val onClose: () -> Unit
) {
    @JavascriptInterface
    fun postMessage(message: String) {
        onMessage(message)
    }

    @JavascriptInterface
    fun closeWebView() {
        onClose()
    }
}
And when the message arrives, Android parses it and reacts:
// since from web we get like this
// from web const message = JSON.stringify({ event: eventName, payload });
fun handleBridgeMessage(message: String) {
  val event = Regex(""event":"([^"]+)"").find(message)?.groupValues?.get(1)
  val email = Regex(""email":"([^"]+)"").find(message)?.groupValues?.get(1)

  context.toast("Android bridge received: ${event ?: "unknown"}")

  if (event == "loginSuccess" && email != null) {
    context.toast("WebView login captured for $email")
  }
}
The app is no longer just launching the auth surface — it is participating in it. That can be exactly right for app-owned web modules. For SSO, it is often the wrong boundary.
5. Custom Tabs Integration Setup
Custom Tabs is the “browser owns auth” model.
The simplest possible Custom Tab launch looks like this:
String url = "https://developers.android.com";
CustomTabsIntent intent = new CustomTabsIntent.Builder().build();
intent.launchUrl(MainActivity.this, Uri.parse(url));
That is fine if you just want to open a link. For Single Sign On you need more, than that. You need the browser to be ready before the user taps on it and you need to pass a session so the browser can route the navigation correctly to the Single Sign On. That is where the service binding comes in for the Single Sign On.
Dependency Setup in Android
The first requirement for Custom Tabs is the AndroidX browser library.
In app/build.gradle.kts:
implementation("androidx.browser:browser:1.8.0")
If you were not using a version catalog, the equivalent dependency would look like:
This is the library that gives you:
- CustomTabsIntent
- CustomTabsClient
- CustomTabsSession
- CustomTabsCallback
- Customizations and warmup
Without it, you can still fall back to a raw ACTION_VIEW browser intent, but you lose the real value of Custom Tabs: warmup, session reuse, and customization.
The Prewarm — warmup, session, mayLaunchUrl
One of the biggest practical advantages of Custom Tabs is that the browser can be prepared before the user taps the button.
The browser service is bound early. Then:
- warmup(0L) starts browser-side work in advance
- a CustomTabsSession is created
- mayLaunchUrl() hints the likely navigation target
That means the browser is not starting cold when login begins.Google’s own documentation says warmup() can save up to 700ms when opening a link.
This is especially relevant for auth because:
- enterprise pages can be heavy
- redirects often happen quickly
- user-perceived delay matters a lot on the very first interaction
The WebView path can still be tuned, but it pays more renderer and lifecycle cost inside the app process.
The service connection looks like this:
serviceConnection = object : CustomTabsServiceConnection() {
    override fun onCustomTabsServiceConnected(
        name: ComponentName,
        client: CustomTabsClient
    ) {
        customTabsClient = client
        client.warmup(0L)                        // warm the browser engine
        customTabsSession = createSession(client) // create a navigation session
    }

override fun onServiceDisconnected(name: ComponentName?) {
        customTabsClient = null
        customTabsSession = null
    }
}
CustomTabsClient.bindCustomTabsService(context, packageName, serviceConnection!!)
Calling warmup(0L) gets the browser ready behind the scenes — it starts up its rendering engine, gets the JavaScript engine going, sets up networking, and preps everything it needs to display web pages. The 0L parameter doesn’t really do anything for now, but you still have to include it. Just calling warmup on its own does a lot, even if you haven’t asked for any specific URL yet.
After you’ve set up a browser session, there’s mayLaunchUrl(). This one lets you give the browser a heads-up about which link the user is probably going to open next.
fun prepareUrl(url: Uri) {
    if (customTabsSession == null) {
        customTabsClient?.let { customTabsSession = createSession(it) }
    }
    customTabsSession?.mayLaunchUrl(url, null, null)
}
Here’s how mayLaunchUrl() works: it gives the browser a heads-up that you’re probably going to visit a page soon. So, behind the scenes, the browser starts getting things ready — it looks up the URL, opens a connection, and might even grab some resources in advance. All this happens before you even tap that link. So when you do, the page can pop up almost instantly.
This is called right before the Custom Tab launches:
performanceManager.prepareUrl(targetUri)
By the time launcher.launch(customTabsIntent.intent) fires, the browser has already done significant setup work on behalf of the user.
6. Custom Tabs Integration in This Project
The login URL is built with a callback parameter: (Deeplink to be called from the browser side when validated with success result!)
fun buildCustomTabsLoginUrl(url: String? = "10.0.2.2:3000/"): String {
    val base = url // emulator localhost
    return "${base}?callbackUrl=androidcustomtabs://login"
}
Then the app launches the page using a prepared Custom Tabs session:
fun openWithCustomTabs(
    keyboardController: SoftwareKeyboardController?,
    context: Context,
    url: String,
    performanceManager: CustomTabsPerformanceManager
): String? {
    val targetUri = buildCustomTabsLoginUrl(url).toUri()

    if (!performanceManager.isSupported()) {
        return "No Custom Tabs supporting browser found on this device."
    }

    performanceManager.prepareUrl(targetUri)


    val customTabsIntent = CustomTabsIntent.Builder(performanceManager.getSession())
        .setShowTitle(true)
        .setUrlBarHidingEnabled(true)
        .setShareState(CustomTabsIntent.SHARE_STATE_ON)
        .setInstantAppsEnabled(false)
        .build()
        .apply {
            intent.`package` = performanceManager.getPackageName()
            intent.addFlags(Intent.FLAG_ACTIVITY_NO_HISTORY)
            intent.data = targetUri
        }

    performanceManager.markLaunchStarted()
    customTabsIntent.launchUrl(context, targetUri)
    keyboardController?.hide()
    return null
}
private fun createSession(client: CustomTabsClient): CustomTabsSession? {
    return client.newSession(object : CustomTabsCallback() {
        override fun onNavigationEvent(navigationEvent: Int, extras: Bundle?) {
            val now = SystemClock.elapsedRealtime()
            when (navigationEvent) {
                NAVIGATION_STARTED -> {
                    if (launchStartTimeMs > 0L) navStartedAtMs = now - launchStartTimeMs
                }
                TAB_SHOWN -> {
                    if (launchStartTimeMs > 0L && firstPaintAtMs == null)
                        firstPaintAtMs = now - launchStartTimeMs
                }
                NAVIGATION_FINISHED -> {
                    val visibleMs = firstPaintAtMs ?: (now - launchStartTimeMs)
                    val fullMs = now - launchStartTimeMs
                    context.toast(
                        "Custom Tabs metricsn" +
                        "NAV ${navStartedAtMs}ms · paint ${visibleMs}ms · full ${fullMs}ms"
                    )
                }
            }
        }
    })
}
There are two important things here:
1. It uses a CustomTabsSession
A CustomTabsSession lets an app stay connected to a browser, like Chrome, to offer a smoother, more personalized browsing experience. With it, the app can warm up the browser ahead of time, load content faster by pre-fetching pages, and tweak things like toolbar colors or add custom menu items. In the end, this makes web pages blend in better with the app itself.
2. It launches a browser-managed auth surface
The page is no longer inside your app’s DOM control. That is good for SSO.
Step 1: User feeds login details
Step 2: After successful login, the web redirects back to Android via deep link callback
When login succeeds, and the page is not inside WebView, it redirects back to the app.
And the actual redirect is built like this:
function redirectToApp(source) {
  const callbackUrl = getCallbackUrl();
  const target = new URL(callbackUrl);
  target.searchParams.set('email', state.session.email);
  target.searchParams.set('name', state.session.name);
  target.searchParams.set('source', source || state.session.source || 'custom-tabs');
  target.searchParams.set('transport', 'deep-link');
  target.searchParams.set('token', state.session.jwt);
  window.location.href = target.toString();
}
That produces a URI like and with valid token:
androidcustomtabs://login?email=demo@sso.com&name=Demo%20User&source=login&transport=deep-link&token=eik....
Step 3: Android receives and processes the callback
AndroidManifest.xml defines the schemas
<intent-filter>
    <action android:name="android.intent.action.VIEW" />
    <category android:name="android.intent.category.DEFAULT" />
    <category android:name="android.intent.category.BROWSABLE" />
    <data android:scheme="androidcustomtabs" android:host="login" />
</intent-filter>
SinceMainActivity is set to launchMode=”singleTask”, so when the deep link arrives, onNewIntent is called on the existing activity instance rather than creating a new one:
class MainActivity : ComponentActivity() {
  var deepLinkIntent by mutableStateOf<Intent?>(null)
  private set

  override fun onCreate(savedInstanceState: Bundle?) {
    super.onCreate(savedInstanceState)
    deepLinkIntent = intent
  }

  override fun onNewIntent(intent: Intent) {
    super.onNewIntent(intent)
    setIntent(intent)
    deepLinkIntent = intent
  }
}
Our BrowserDemoApp.kt watches that deep link and restores the session as deepLinkIntent is a reactive mutableStateOf property. BrowserDemoApp watches it via LaunchedEffect:
LaunchedEffect(activity?.deepLinkIntent) {
  extractSessionFromUri(activity?.deepLinkIntent?.data)?.let {
    currentSession = it
    errorMessage = ""
    context.toast("Custom Tabs returned to app for ${it.email}")
  }
}
and it can be extracted like this
fun extractSessionFromUri(uri: Uri?): DemoSession? {
    if (uri == null) return null
    val email = uri.getQueryParameter("email") ?: return null
    val name = uri.getQueryParameter("name") ?: email.substringBefore('@')
    val source = uri.getQueryParameter("source") ?: "custom-tabs"
    return DemoSession(
        name = name,
        email = email,
        source = source,
        transport = "deep-link"
    )
}
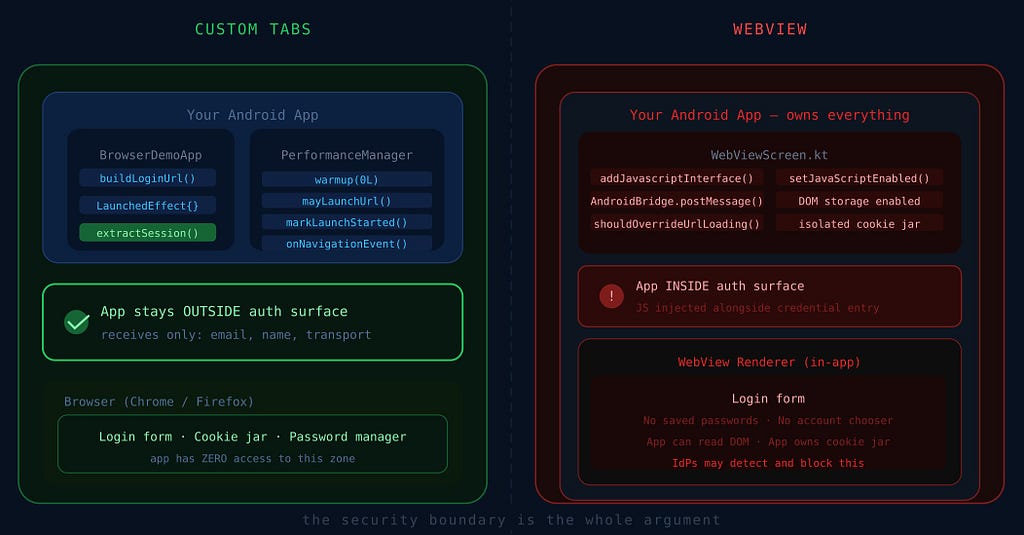
The whole process from tapping a button to updating a session card happens without adding any JavaScript code to the login page. The app stays outside of the authentication surface.
That is the transfer of control in a browser-based authentication process.
Custom Tabs gives you that. It takes away control at the page level. It keeps control at the process level.
For SSO, that is usually what you want.
Conclusion
If you build a real Single Sign-On flow, on Android start with Custom Tabs.
This code shows you why in a way.
WebView gives you control over a page, which can be useful.
For authentication especially when the identity provider drives it that extra control often means more maintenance work, more coupling and more security issues to handle.
Custom Tabs is not better just because it is popular. It is better because it does the job properly for authentication. Custom Tabs and authentication go well together.
You should use Custom Tabs for authentication:
- launch a browser login
- let the browser handle the browser concerns
- receive a callback when auth finishes
- restore app state cleanly
That is the model implemented here. And that is the model most Android teams should treat as the default for SSO. We can def
About the Author
I’m just a passionate developer who loves finding creative elegant solutions to complex problems. Feel free to chat on LinkedIn for Android-related stuff and more. Thank You for reading this!
I Stopped Using WebView for Login — Here’s Why Android Custom Tabs Win for SSO was originally published in ProAndroidDev on Medium, where people are continuing the conversation by highlighting and responding to this story.

This Post Has 0 Comments