
Stop fighting with Image() containers and finally master aspect ratios with this simple, visual breakdown
Ever stared at an Image() composable wondering why your beautiful 4K photo looks like it went through a trash compactor? Or why there’s mysterious white space around it like it’s social distancing from the edges?
Yeah, that’s ContentScale messing with you. Or rather, you not knowing which ContentScale to pick.
Let’s fix that. Permanently.
The Setup: What Problem Are We Even Solving?
Here’s the fundamental issue. Your image has a size. Your container (the Image composable with its modifiers) has a size. And almost never are they the same.
Your Image: 1200 x 800 (landscape photo)
Your Container: 300 x 400 (portrait box on screen)
So the system has to make a decision: how do I shove this rectangular peg into a differently-shaped rectangular hole?
That decision is ContentScale.
Image(
    painter = painterResource(id = R.drawable.puppy),
    contentDescription = "Good boy",
    modifier = Modifier.size(300.dp, 400.dp),
    contentScale = ContentScale.Fit  // <-- THIS. This is what we're talking about.
)
The Mental Model: Think of a Picture Frame
Imagine you bought a picture frame from IKEA (the container). Now you have a photo (the image) that doesn’t quite match the frame’s dimensions. What do you do?
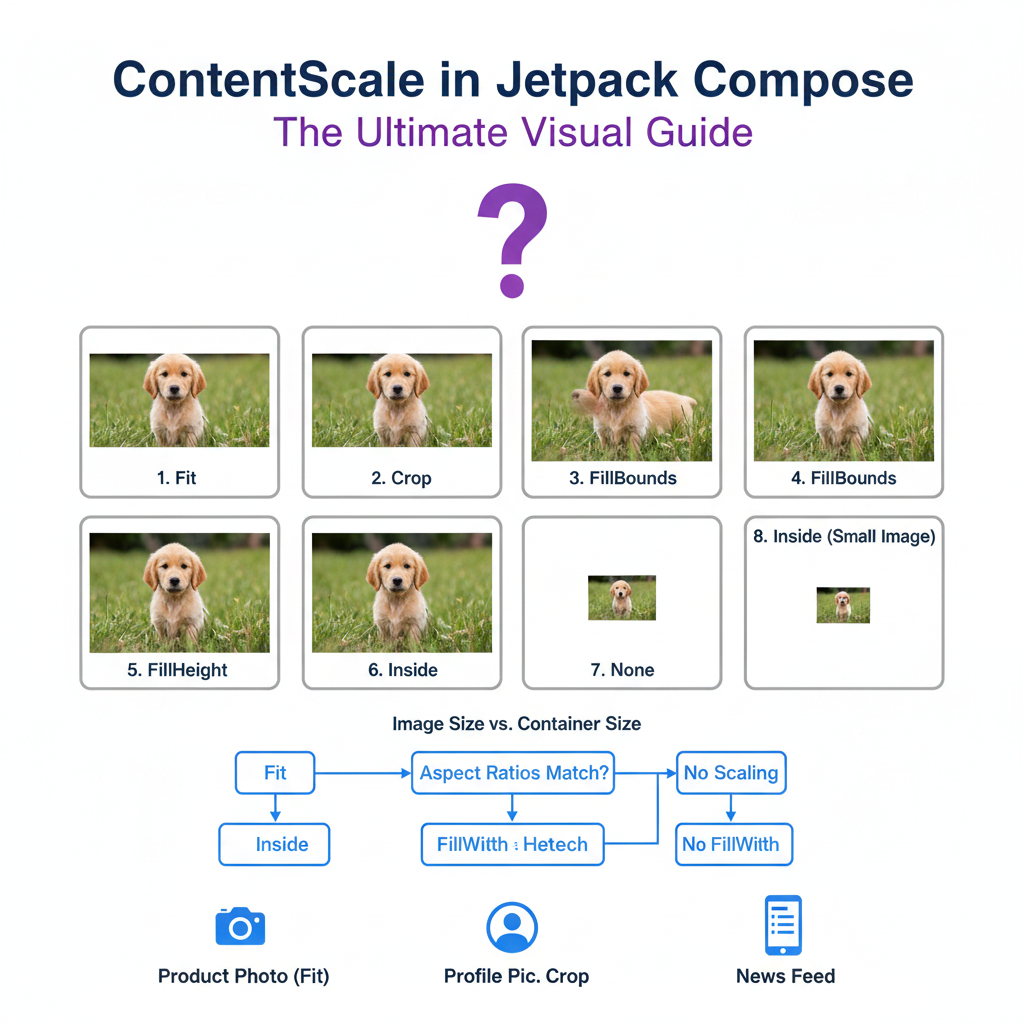
The Visual Breakdown
For every example below, assume:
- Image: 1200 x 600 (wide landscape, 2:1 ratio)
- Container: 400 x 400 (square box)
The container is shown as the outer box. The image is what’s inside.
1. ContentScale.Fit
Rule: Scale the image so it fits entirely inside the container. Maintain aspect ratio. The image touches the container on the tighter dimension.
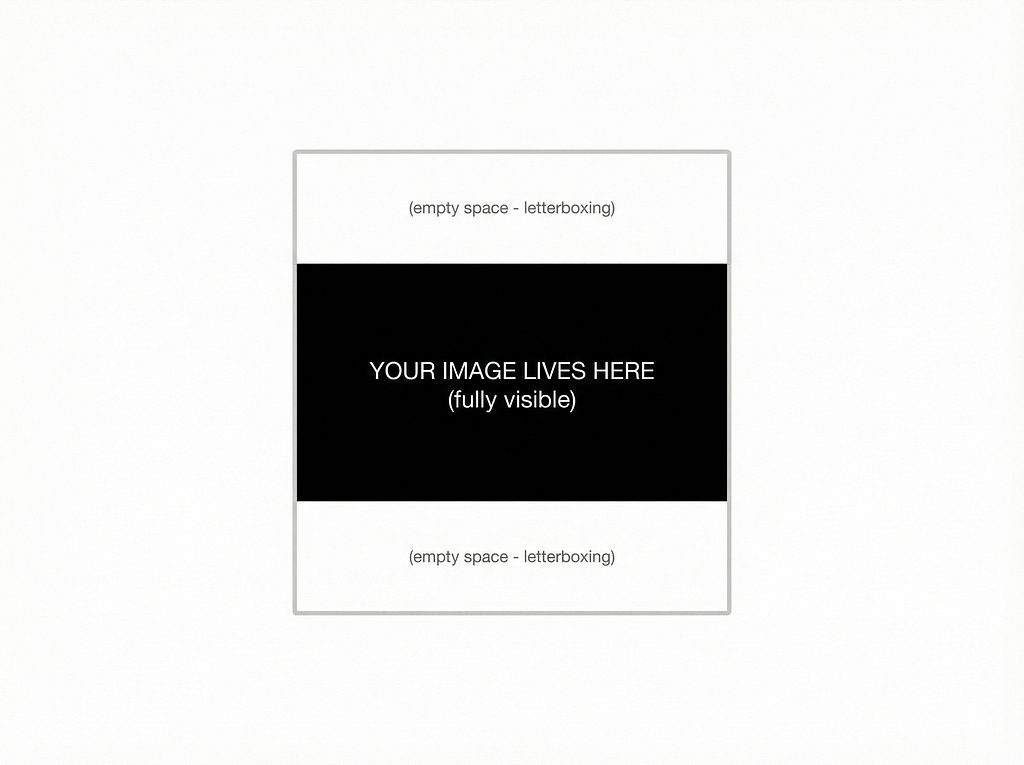
What happened: The image was scaled down to 400×200 (maintaining 2:1). It fits the width perfectly (400), but the height is only 200, leaving 100px of empty space on top and bottom.
The math:
scaleX = containerWidth / imageWidth   = 400/1200 = 0.333
scaleY = containerHeight / imageHeight = 400/600  = 0.667
scale  = min(scaleX, scaleY)           = 0.333
Result: 1200 * 0.333 = 400 wide, 600 * 0.333 = 200 tall
Use when: You need the user to see the entire image, no matter what. Think: product photos in an e-commerce app, document previews, thumbnails where completeness matters.
2. ContentScale.Crop
Rule: Scale the image so it fills the entire container. Maintain aspect ratio. Chop off whatever overflows. The image touches the container on the looser dimension.
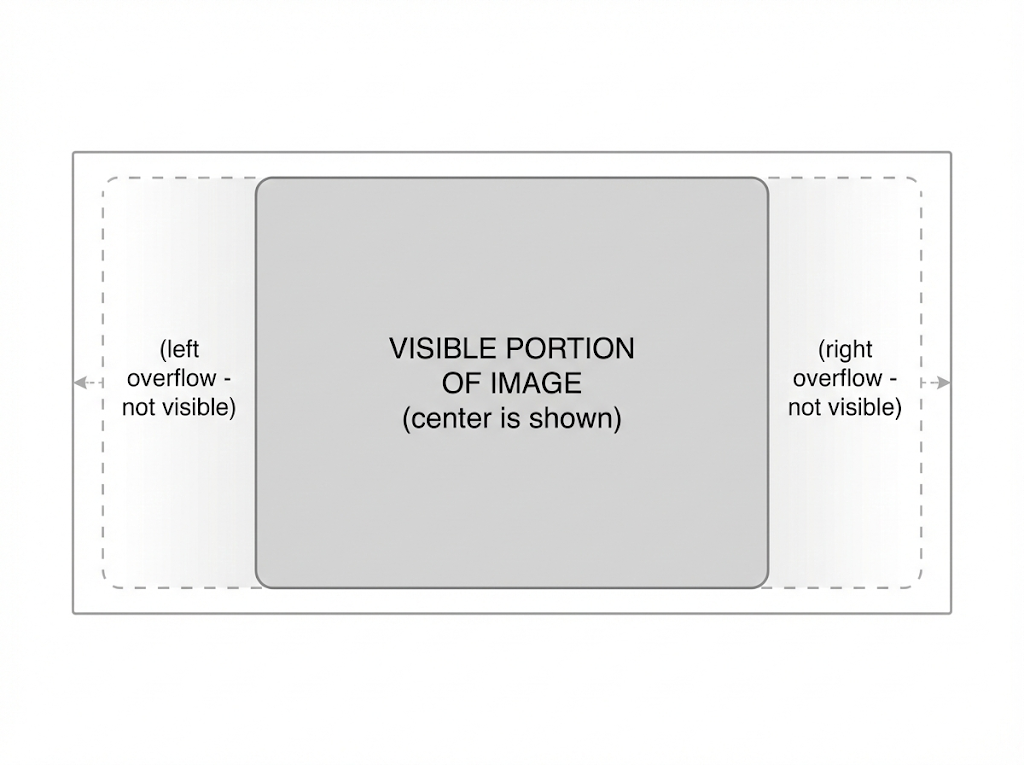
What happened: The image was scaled up to 800×400 (maintaining 2:1). Height matches perfectly (400), but width is 800 — so 200px is clipped from each side.
The math:
scaleX = containerWidth / imageWidth   = 400/1200 = 0.333
scaleY = containerHeight / imageHeight = 400/600  = 0.667
scale  = max(scaleX, scaleY)           = 0.667
Result: 1200 * 0.667 = 800 wide, 600 * 0.667 = 400 tall
         (800 - 400) / 2 = 200px clipped each side
Notice the only difference from Fit: min vs max. That’s it. That’s the whole difference. Fit uses min(scaleX, scaleY), Crop uses max(scaleX, scaleY).
Use when: You want the container completely filled with no empty space. Think: background images, hero banners, profile picture circles, any “cover image” scenario.
3. ContentScale.FillBounds
Rule: Stretch or squash the image to exactly match the container. Aspect ratio? What aspect ratio?

What happened: The 1200×600 image is now exactly 400×400. People in the photo now look shorter and wider. Circles become ovals. It’s chaos.
The math:
scaleX = containerWidth / imageWidth   = 400/1200 = 0.333
scaleY = containerHeight / imageHeight = 400/600  = 0.667
// Use BOTH scales independently. X and Y scale differently.
Result: exactly 400 x 400. Aspect ratio destroyed.
Use when: Almost never for photos. But useful for: solid color backgrounds, repeating patterns that tolerate distortion, gradient images, or when your image and container reliably have the same aspect ratio.
4. ContentScale.FillWidth
Rule: Scale so the image’s width exactly matches the container’s width. Maintain aspect ratio. Height does whatever it needs to do.

What happened: Width scaled to 400. With 2:1 ratio, height becomes 200. Since container is 400 tall, there’s 200px of dead space at the bottom.
The math:
scale = containerWidth / imageWidth = 400/1200 = 0.333
Result: 1200 * 0.333 = 400 wide, 600 * 0.333 = 200 tall
But wait — if the image were tall/portrait (say 600×1200), FillWidth would scale width to 400, making height 800, which OVERFLOWS the 400px container. In that case you get cropping on top and bottom.
Use when: Scrollable vertical lists where width consistency matters. Think: a news feed where images should span the full width, or a LazyColumn of cards.
5. ContentScale.FillHeight
Rule: Scale so the image’s height exactly matches the container’s height. Maintain aspect ratio. Width does whatever it needs to do.
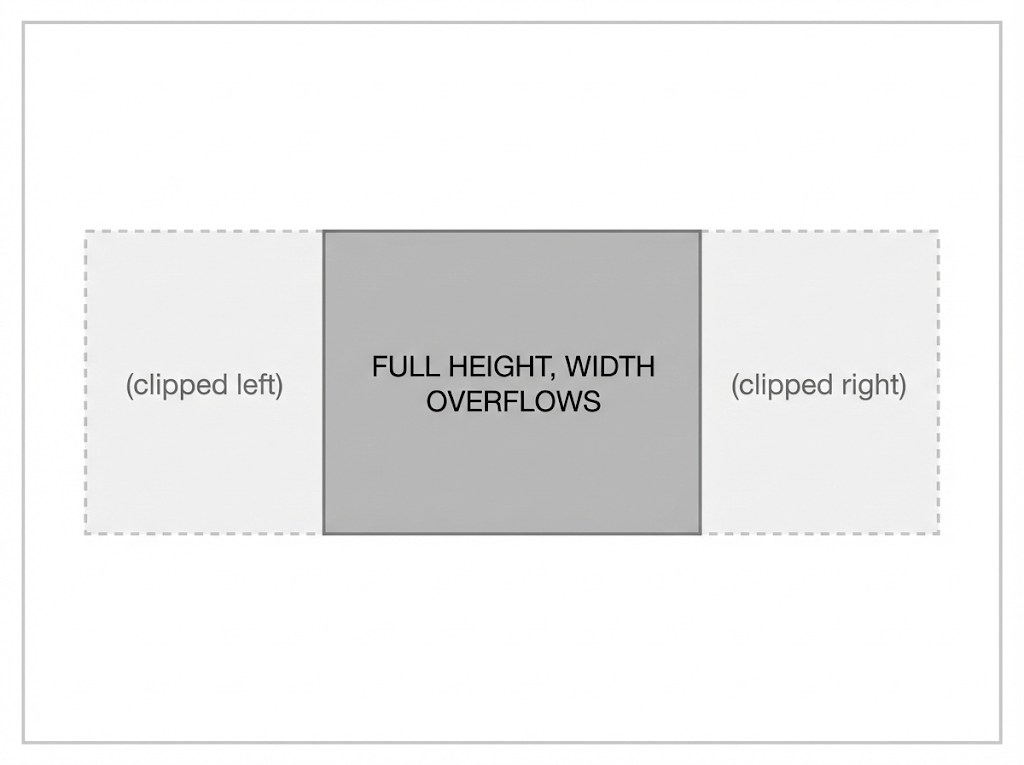
What happened: Height scaled to 400. With 2:1 ratio, width becomes 800. Way wider than our 400px container. 200px clipped on each side.
The math:
scale = containerHeight / imageHeight = 400/600 = 0.667
Result: 1200 * 0.667 = 800 wide, 600 * 0.667 = 400 tall
Use when: Horizontal scrolling galleries (LazyRow), situations where you need height consistency across items.
6. ContentScale.Inside
Rule: If the image is larger than the container, behave exactly like Fit. If the image is smaller than the container, don’t scale it up — just center it at its original size.
When image is LARGER than container (1200×600 -> 400×400 box):
Behaves exactly like Fit.
When image is SMALLER than container (100×50 -> 400×400 box):

The key difference from Fit: Fit would scale the 100×50 image UP to 400×200. Inside says “nope, it already fits inside, leave it alone.”
The math:
scaleX = containerWidth / imageWidth
scaleY = containerHeight / imageHeight
scale  = min(scaleX, scaleY)
if (scale >= 1.0) scale = 1.0  // DON'T upscale
Use when: You want to show images at their natural resolution when they’re small enough, but prevent huge images from blowing out of the container.
Think: chat app image messages, user-uploaded content where you don’t want to upscale low-res images and make them blurry.
7. ContentScale.None
Rule: Don’t scale. At all. Center the image at its original pixel size. If it’s bigger than the container, it gets clipped. If it’s smaller, there’s empty space.
When image is LARGER (1200×600 in a 400×400 box):

When image is SMALLER (100×50 in a 400×400 box):
Same as Inside -- centered, tiny, no scaling.
Use when: Pixel-art, sprites, icons that must remain at exact pixel sizes, or any scenario where scaling would ruin the content.
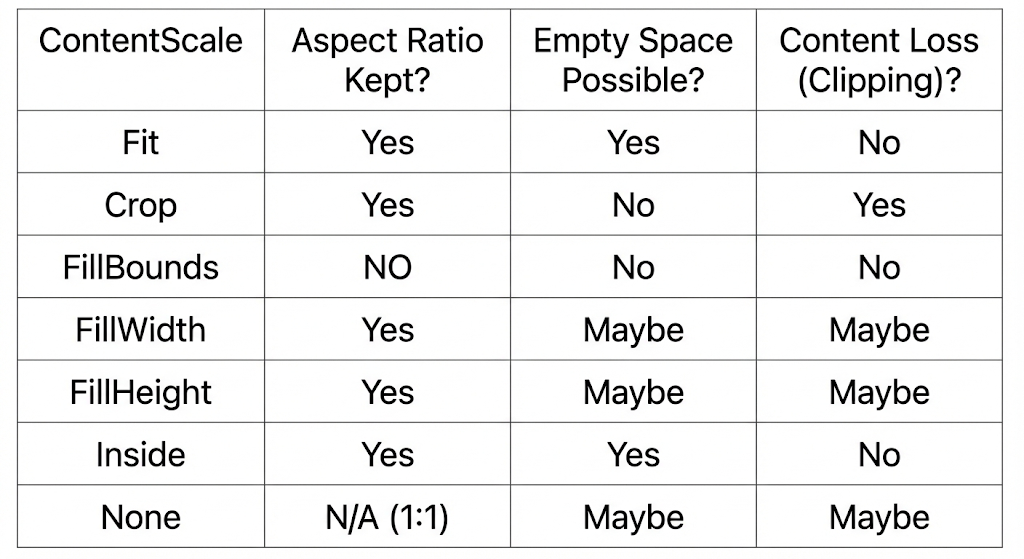
The Cheat Sheet (Bookmark This)
The decision flowchart:

Under The Hood: How Does Compose Actually Do This?
When you pass contentScale to an Image, here’s what’s really happening deep in the rendering pipeline:
Step 1: Measurement
The Image composable measures itself based on its Modifier constraints. If you say Modifier.size(300.dp, 400.dp), the container becomes 300×400 dp (converted to pixels using density).
Step 2: ContentScale.computeScaleFactor()
Every ContentScale is actually an interface with one key method:
// This is what ContentScale looks like under the hood
fun interface ContentScale {
    fun computeScaleFactor(srcSize: Size, dstSize: Size): ScaleFactor
}
ScaleFactor is just a pair: (scaleX: Float, scaleY: Float).
Here’s how each variant implements it:
// Fit
ContentScale.Fit -> {
    val scale = min(dstWidth / srcWidth, dstHeight / srcHeight)
    ScaleFactor(scale, scale)  // same scale for both axes = aspect ratio preserved
}
// Crop
ContentScale.Crop -> {
    val scale = max(dstWidth / srcWidth, dstHeight / srcHeight)
    ScaleFactor(scale, scale)  // same scale, but max instead of min
}
// FillBounds
ContentScale.FillBounds -> {
    ScaleFactor(dstWidth / srcWidth, dstHeight / srcHeight)
    // different scales for X and Y = aspect ratio broken
}
// FillWidth
ContentScale.FillWidth -> {
    val scale = dstWidth / srcWidth
    ScaleFactor(scale, scale)
}
// FillHeight
ContentScale.FillHeight -> {
    val scale = dstHeight / srcHeight
    ScaleFactor(scale, scale)
}
// Inside
ContentScale.Inside -> {
    if (srcWidth <= dstWidth && srcHeight <= dstHeight) {
        ScaleFactor(1f, 1f)  // already fits, don't upscale
    } else {
        // same as Fit
        val scale = min(dstWidth / srcWidth, dstHeight / srcHeight)
        ScaleFactor(scale, scale)
    }
}
// None
ContentScale.None -> {
    ScaleFactor(1f, 1f)  // always 1:1, no scaling ever
}
Step 3: Translation (Centering)
After scaling, the image might not fill the container. The system centers the scaled image using Alignment (default is Alignment.Center):
val offsetX = (containerWidth - scaledImageWidth) / 2
val offsetY = (containerHeight - scaledImageHeight) / 2
You can override this with the alignment parameter on Image():
Image(
    painter = painterResource(id = R.drawable.landscape),
    contentDescription = null,
    contentScale = ContentScale.Crop,
    alignment = Alignment.TopStart  // crop from top-left instead of center
)
This is super useful with Crop — for example, if you have a portrait photo and want to make sure the person’s face (usually near the top) isn’t cropped off, use Alignment.TopCenter.
Step 4: Canvas Drawing
Finally, Compose applies a transformation matrix to the Canvas before drawing:
Canvas -> translate(offsetX, offsetY) -> scale(scaleX, scaleY) -> drawImage
If the scaled image exceeds the container bounds (like in Crop), the container’s clip bounds handle the cropping. The clipToBounds modifier (applied internally by Image) ensures overflow is hidden.
Common Mistakes & Pro Tips
Mistake 1: Using FillBounds for photos
Your users’ faces will look like they’re in a funhouse mirror. Use Crop instead.
Mistake 2: Using Fit for background images
You’ll get ugly letterboxing. Use Crop for backgrounds.
Mistake 3: Forgetting alignment with Crop
By default, Crop centers the visible area. For profile photos, consider Alignment.TopCenter so faces don’t get cut off at the top.
Mistake 4: Confusing Fit and Inside
They’re identical when images are larger than the container. The difference only shows up with smaller images: Fit upscales, Inside doesn’t.
Pro Tip: ContentScale works with ANY Painter
Not just painterResource. It works with rememberAsyncImagePainter (Coil), rememberImagePainter, vector drawables, custom painters — anything.
Pro Tip: Combine with Modifier.aspectRatio()
Image(
    painter = painterResource(R.drawable.hero),
    contentDescription = null,
    contentScale = ContentScale.Crop,
    modifier = Modifier
        .fillMaxWidth()
        .aspectRatio(16f / 9f)  // forces a 16:9 container
)
Now you get a consistently shaped container AND the image fills it perfectly with Crop. This is the combo you’ll use for hero images, cards, and media players.
Quick Reference Code Snippets
// Product thumbnail (show full image)
ContentScale.Fit

// Profile picture circle
ContentScale.Crop + Modifier.clip(CircleShape)

// Full-screen background
ContentScale.Crop + Modifier.fillMaxSize()

// News feed image (full width, flexible height)
ContentScale.FillWidth + Modifier.fillMaxWidth()

// Horizontal gallery
ContentScale.FillHeight + Modifier.fillMaxHeight()

// Chat image (don't upscale small images)
ContentScale.Inside

// Pixel art or sprites
ContentScale.None
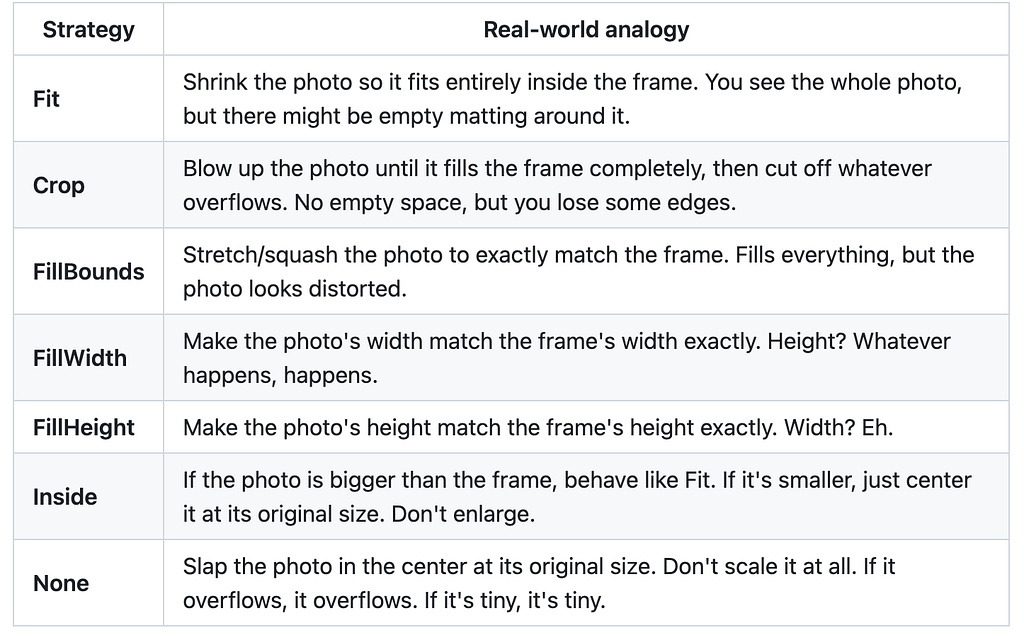
TL;DR
- Fit = see everything, accept empty space
- Crop = fill everything, accept losing edges
- FillBounds = fill everything, accept distortion (rarely want this)
- FillWidth = lock the width, let height do its thing
- FillHeight = lock the height, let width do its thing
- Inside = Fit but refuses to upscale small images
- None = don’t touch my pixels
The secret sauce is just one function: computeScaleFactor(src, dst) returning (scaleX, scaleY). Every variant is just a different strategy for computing those two numbers. That’s it. That’s the whole thing.
Now go ship some properly-scaled images.
If this saved you from a StackOverflow rabbit hole, you’re welcome.
ContentScale in Jetpack Compose: The Ultimate Visual Guide was originally published in ProAndroidDev on Medium, where people are continuing the conversation by highlighting and responding to this story.


This Post Has 0 Comments