

Introduction
Today, Mobile and Android developers are very good at building applications. AI-powered tools have made this process faster and easier. But to understand how AI changed development, we need to look at what developers used before AI existed.
Before AI became popular in development, developers relied on IDE plugins to help them work better. These plugins were part of development environments like Android Studio and IntelliJ IDEA. They helped with important tasks such as organizing project structure, finding unnecessary or slow code, and running automatic tests.
Well-known tools like SonarLint and Checkstyle helped developers keep their code clean and tidy — all without any AI. These plugins made the development process more organized and consistent. In a way, they were a stepping stone between writing everything by hand and using the intelligent, AI-powered tools that developers commonly use today.
To follow this material comfortably, you should have a basic knowledge of Kotlin and Android development, and understand what development plugins in IntelliJ are used for. We will go through the full process step by step, from building the plugin all the way to publishing it on the JetBrains Marketplace.
Getting started
- Download your latest Android Studio here or find your archive version here
- If you previously have Android Studio installed, check your current version. In this case my version:
Android Studio Otter 3 Feature Drop | 2025.2.3
Build #AI-252.28238.7.2523.14688667, built on January 9, 2026
3. Download Install Intellij here (Before installing it, check compatibility between your Android studio and Intellij version here). In this case my version:
Intellij IDEA 2025.2.5 (Ultimate Edition)
Build #IU-252.28238.7, built on November 20, 2025
4. After you downloading intellij, Install and open it.
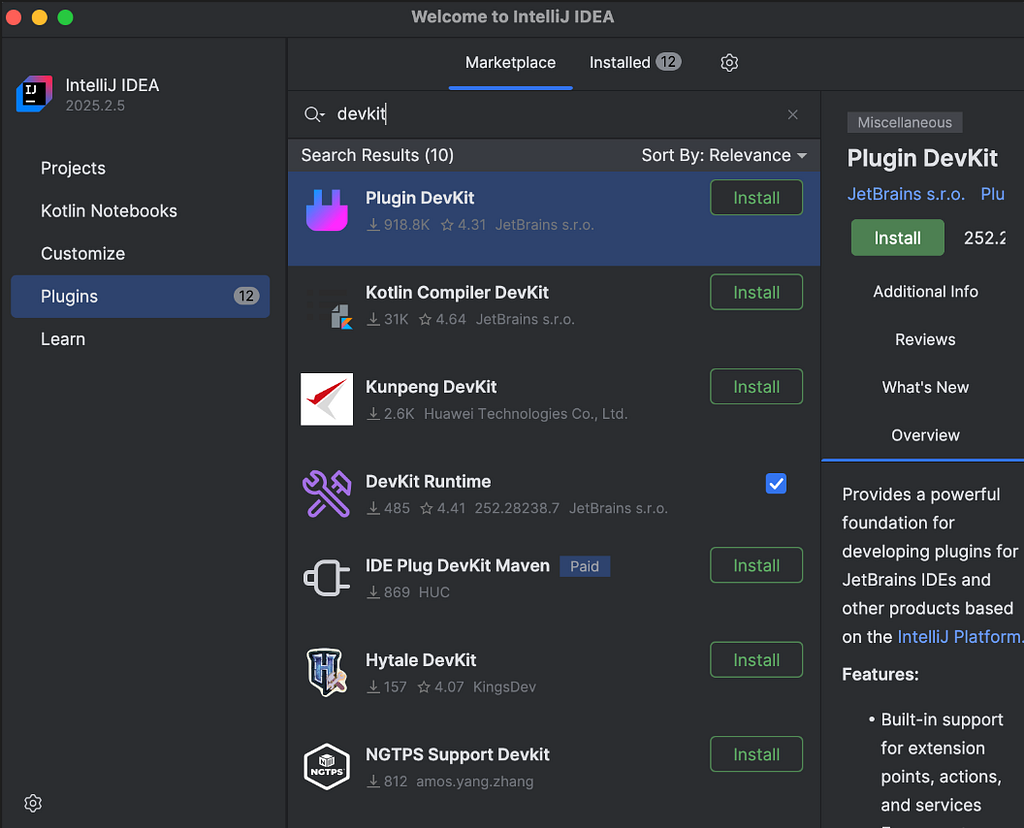
5. Go to plugin marketplace and install Plugin Devkit (because you want to build a plugin, right?)
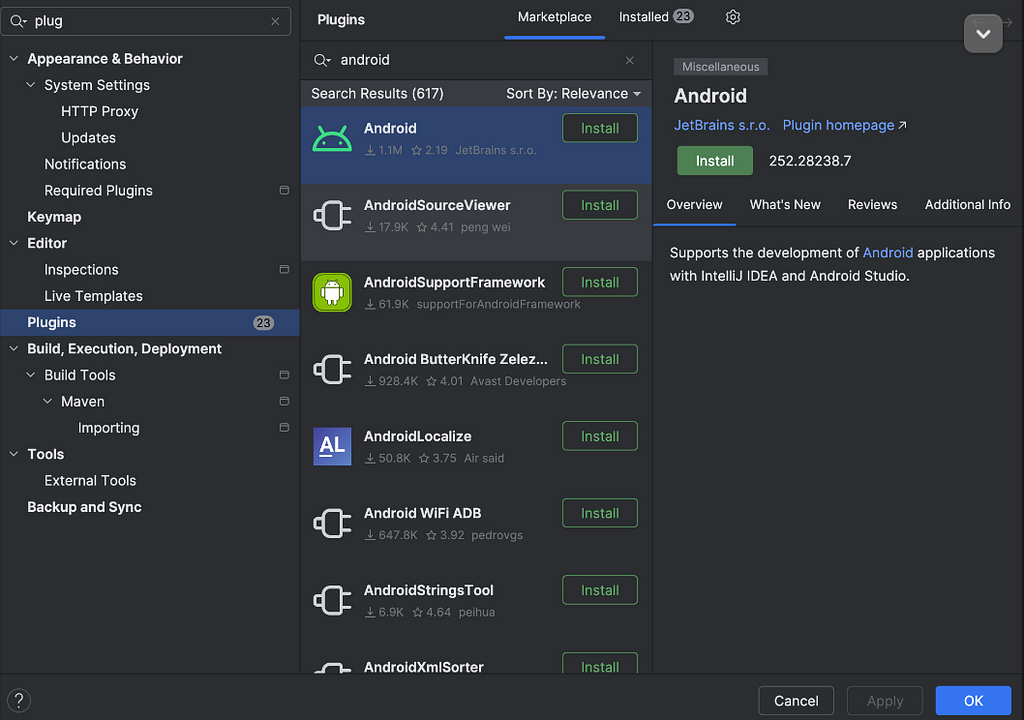
6. Install Plugin Android (because you want to build a specific Android Studio Plugin)
7. After install those plugins, create new project and choose IDE Plugin section. Fill your plugin name, project location, package id, etc
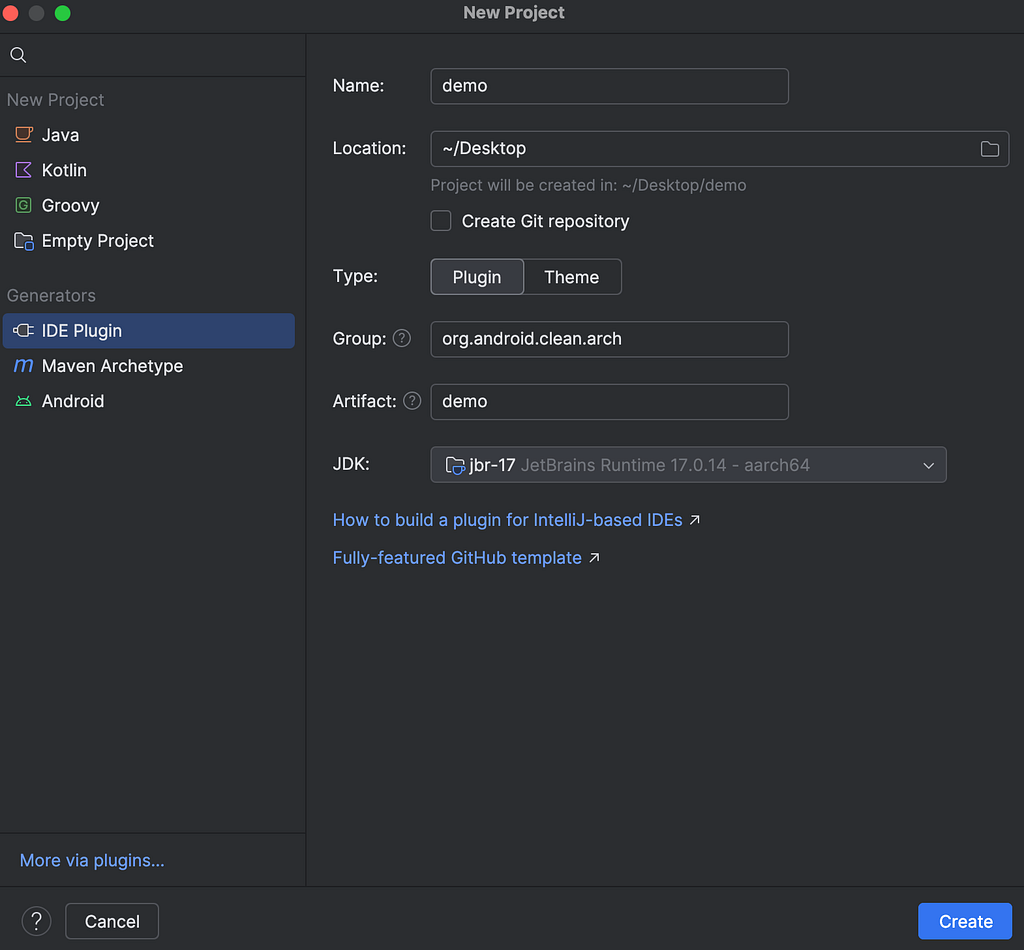
The minimum required JDK is 21 because most modern frameworks and IntelliJ Platform versions (2025.2.x and later) depend on it. JDK 17 is typically used only for legacy plugin projects that target older IDE versions.
8. After successfully creating a new project, your project structure will look like this:
my_plugin/
├── build.gradle.kts        ← Gradle build config
├── gradle.properties       ← Plugin & Gradle properties
├── settings.gradle.kts     ← Project name & repositories
├── gradle/                 ← Gradle wrapper files
└── src/
    └── main/
        └── resources/
            └── META-INF/
                └── plugin.xml   ← Plugin configuration
- Gradle build configuration is used to manage how the plugin is built, compiled, tested, and packaged. It automates the development workflow and ensures the plugin can run correctly in the IDE. The configuration is written in the build.gradle.kts or build.gradle file in the plugin project used by IDEs like Android Studio.
plugins {
    id("org.jetbrains.intellij") version "1.17.0"
}

intellij {
    version.set("2025.2.3")
    type.set("IC")
}

tasks {
    patchPluginXml {
        sinceBuild.set("231")
        untilBuild.set("241.*")
    }
}
- Plugin Properties and Gradle Properties are configuration values used to control how the plugin is built, identified, and managed during development. Plugin properties define basic information about the plugin that will appear in the IDE or plugin marketplace: Plugin ID, Plugin name, Version, Description, Vendor information, Supported IDE build versions.
pluginName=MySamplePlugin
pluginVersion=1.0.0
platformVersion=2025.2.3
platformType=IC
- Project Name and Repositories are part of the Gradle configuration that help organize the project and manage external dependencies. Commonly contains Maven Central, JetBrains Plugin Repository, Google Maven Repository
rootProject.name = "my-intellij-plugin"
.
.
repositories {
    mavenCentral()
    google()
}
- Gradle Wrapper files are used to ensure that everyone working on the project uses the same Gradle version, without needing to install Gradle manually.
distributionUrl=https://services.gradle.org/distributions/gradle-8.5-bin.zip
- the Plugin Configuration defines the essential information and behavior of the plugin so the IDE knows how to load, identify, and use it. It contains Plugin ID, Name, Version, Vendor or author, and Description
9. After this, setup and define your Android SDK location in your Intellij:
Click top navigation Intellij IDEA → Setting → Build, Execution, Deployment → Languages & Framework → Android SDK Updater

10. After finishing setup SDK, Open build.gradle.kts and see the components:
plugins {
    id("java")
    id("org.jetbrains.kotlin.jvm") version "2.1.0"
    id("org.jetbrains.intellij.platform") version "2.7.1"
}

group = "com.android.kotlin"
version = "1.0"

repositories {
    mavenCentral()
    intellijPlatform {
        defaultRepositories()
    }
}

// Configure IntelliJ Platform Gradle Plugin
// Read more: https://plugins.jetbrains.com/docs/intellij/tools-intellij-platform-gradle-plugin.html
dependencies {
    intellijPlatform {
        create("AI", "2025.2.3.8") // for install new Android Studio if you don't have
        bundledPlugin("com.intellij.java")
        bundledPlugin("org.jetbrains.kotlin")
        testFramework(org.jetbrains.intellij.platform.gradle.TestFrameworkType.Platform)
    }
}

intellijPlatform {
    pluginConfiguration {
        ideaVersion {
            sinceBuild = "251"
        }

        changeNotes = """
            Initial version
        """.trimIndent()
    }
}

tasks {
    // Set the JVM compatibility versions
    withType<JavaCompile> {
        sourceCompatibility = "21"
        targetCompatibility = "21"
    }
}

kotlin {
    compilerOptions {
        jvmTarget.set(org.jetbrains.kotlin.gradle.dsl.JvmTarget.JVM_21)
    }
}
- This code below defines the version number of the plugin
group = "com.android.kotlin"
version = "1.0"
- Code below is intended to put your change log and notes of your plugin. It will be shown in your Plugin change log when user installs it.
changeNotes = """
    Initial version
""".trimIndent()
- Next code below defines what plugin you want to build, There are 2 types: AI and IC. Both refer to the target IDE platform type that your plugin will run on.
- AI stands for Android Studio. If your plugin targets AI, it means the plugin is designed specifically for Android Studio. This is useful when your plugin interacts with Android development tools.
- IC stands for IntelliJ IDEA Community Edition. Plugins built for IC target the IntelliJ Community platform. These plugins usually provide general IDE features.
In this part we’re specifically build plugin for Android Studio so we will use AI with 2025.2.3.8 (Otter 3 Feature Drop) Android Studio version
dependencies {
    intellijPlatform {
        create("AI", "2025.2.3.8")
        bundledPlugin("com.intellij.java")
        bundledPlugin("org.jetbrains.kotlin")
        testFramework(org.jetbrains.intellij.platform.gradle.TestFrameworkType.Platform)
    }
}
if you have android studio in your local, simply replace create(“AI”, “2025.2.3.8”) to local(“/Applications/Android Studio.app”) so it will detect Android Studio locally.
11. Open your main.kt file. It should look like the following:
class Main : AnAction() {
    override fun actionPerformed(event: AnActionEvent) {
    .
    .
    }
}
A plugin class is typically action-based and is triggered automatically when the user performs a specific action.
- The architecture of plugin generated by us when user use our plugin would look like this:
my_app/
├── build.gradle.kts
├── gradle.properties
├── settings.gradle.kts
├── gradle/
└── src/
    └── main/
        ├── java/
        │   └── com/
        │       └── example/
        │           └── myapp/
        │               └── MainActivity.kt
        |               └── model/
        |                   └── SampleModel.kt
        |               └── network/
        |                   └── ApiService.kt
        |                   └── RetrofitInstance.kt
        |               └── repository/
        |                   └── MainRepository.kt
        |               └── use_case/
        |                   └── MainUseCase.kt
        |               └── view_model/
        |                   └── MainViewModel.kt
        └── res/
- But before that, first thing first we are going to create a popup dialog when the user runs our plugin. The dialog is built using Java Swing components (JComponent, BoxLayout, Jpanel, etc) and wrapped inside a DialogWrapper class to display it as a dialog window. We’re going to put 4 Textbox for input Activity, ViewModel, UseCase, and Repository name add some validations there.
class GenerateSolidArchDialog(project: Project?) : DialogWrapper(project) {

    init {
        title = "Generate Minimum Kotlin S.O.L.I.D Architecture"
        init()
    }

    override fun doValidate(): ValidationInfo? {
        if (activityField.text.isBlank()) {
            return ValidationInfo(
                "Activity name cannot be empty",
                activityField
            )
        }

        if (viewModelField.text.isBlank()) {
            return ValidationInfo(
                "ViewModel name cannot be empty",
                viewModelField
            )
        }

        if (useCaseField.text.isBlank()) {
            return ValidationInfo(
                "UseCase name cannot be empty",
                useCaseField
            )
        }

        if (repositoryField.text.isBlank()) {
            return ValidationInfo(
                "Repository name cannot be empty",
                repositoryField
            )
        }

        if (activityField.text.any { it.isDigit() }) {
            return ValidationInfo(
                "Activity name cannot contains numbers",
                activityField
            )
        }

        if (viewModelField.text.any { it.isDigit() }) {
            return ValidationInfo(
                "ViewModel name cannot contains numbers",
                viewModelField
            )
        }

        if (useCaseField.text.any { it.isDigit() }) {
            return ValidationInfo(
                "UseCase name cannot contains numbers",
                useCaseField
            )
        }

        if (repositoryField.text.any { it.isDigit() }) {
            return ValidationInfo(
                "Repository name cannot contains numbers",
                repositoryField
            )
        }

        val values = listOf(activityField.text.trim().lowercase(), viewModelField.text.trim().lowercase(), useCaseField.text.trim().lowercase(), repositoryField.text.trim().lowercase())
        val allSame = values.all { it == values.first() }

        if (allSame) {
            return ValidationInfo(
                "Cannot contains similar identical name among 4 fields",
                repositoryField
            )
        }
        return null
    }

    override fun createCenterPanel(): JComponent {
        val panel = JPanel()
        panel.layout = BoxLayout(panel, BoxLayout.Y_AXIS)
        panel.minimumSize = Dimension(400, 200)
        panel.border = BorderFactory.createEmptyBorder(10, 10, 10, 10)

        // helper to make fields stretch horizontally
        fun stretch(field: JTextField) {
            field.alignmentX = JComponent.LEFT_ALIGNMENT
            field.maximumSize = Dimension(Int.MAX_VALUE, field.preferredSize.height)
        }

        // Activity
        val labelActivity = JLabel("Insert Targeted Activity FileName:")
        activityField.text = "Main Activity"
        labelActivity.alignmentX = JComponent.LEFT_ALIGNMENT
        panel.add(labelActivity)
        panel.add(Box.createVerticalStrut(4))
        stretch(activityField)
        panel.add(activityField)

        // ViewModel
        val labelVM = JLabel("Insert ViewModel name:")
        labelVM.alignmentX = JComponent.LEFT_ALIGNMENT
        panel.add(labelVM)
        panel.add(Box.createVerticalStrut(4))
        stretch(viewModelField)
        panel.add(viewModelField)
        panel.add(Box.createVerticalStrut(10))

        // UseCase
        val labelUseCase = JLabel("Insert UseCase name:")
        labelUseCase.alignmentX = JComponent.LEFT_ALIGNMENT
        panel.add(labelUseCase)
        panel.add(Box.createVerticalStrut(4))
        stretch(useCaseField)
        panel.add(useCaseField)
        panel.add(Box.createVerticalStrut(10))

        // Repository
        val labelRepos = JLabel("Insert Repository Name:")
        labelRepos.alignmentX = JComponent.LEFT_ALIGNMENT
        panel.add(labelRepos)
        panel.add(Box.createVerticalStrut(4))
        stretch(repositoryField)
        panel.add(repositoryField)

        return panel
    }

    fun getActivityName() = activityField.text
    fun getViewModelName() = viewModelField.text
    fun getUseCaseName() = useCaseField.text
    fun getRepositoryName() = repositoryField.text
}
- After that, we implement it in actionPerformed(event: AnActionEvent) by calling showAndGet()
class Main : AnAction() {
  override fun actionPerformed(event: AnActionEvent) {
      val project = event.project
      val dialog = GenerateSolidArchDialog(project)

      if (dialog.showAndGet()) {
          val activity = dialog.getActivityName()
          val viewModel = dialog.getViewModelName()
          val useCase = dialog.getUseCaseName()
          val repository = dialog.getRepositoryName()

          if (project != null
              && !useCase.isNullOrEmpty()
              && !repository.isNullOrEmpty()
              && !viewModel.isNullOrEmpty()
              && !activity.isNullOrEmpty()) {

              val activityFormat = if (activity.any { it.isWhitespace() }) activity.toPascalCase() else activity.capitalizeFirstChar()
              val viewModelFormat = if (viewModel.any { it.isWhitespace() }) viewModel.toPascalCase() else viewModel.capitalizeFirstChar()
              val useCaseFormat = if (useCase.any { it.isWhitespace() }) useCase.toPascalCase() else useCase.capitalizeFirstChar()
              val repositoryFormat = if (repository.any { it.isWhitespace() }) repository.toPascalCase() else repository.capitalizeFirstChar()
              .
              .
          }
      }
  }
}
- Next step, You actually can generate package folder and .kt filename based on user’s input. Follow these steps:
- Define targeted directory and package folder name
val targetDir = getTargetDirectory(activity, project) ?: return
val packageName = JavaDirectoryService
    .getInstance()
    .getPackage(targetDir)
    ?.qualifiedName ?: return
2. Generate package folder name, Let say we want to generate model, network, view_model, use_case, repository
// Generate Folder
generatePackageFolder(project, targetDir, "model")
generatePackageFolder(project, targetDir, "network")
generatePackageFolder(project, targetDir, "view_model")
generatePackageFolder(project, targetDir, "use_case")
generatePackageFolder(project, targetDir, "repository")
fun generatePackageFolder(
    project: Project,
    targetDir: PsiDirectory,
    newPackageName: String
) {
    return WriteCommandAction.runWriteCommandAction(project) {
        // check if subfolder already exists
        val existing = targetDir.findSubdirectory(newPackageName)
        if (existing == null) {
            targetDir.createSubdirectory(newPackageName)
        }
    }
}
3. After we generate folder, we enter the each directory and generate .kt file
// Generate file
val targetDirMdl = targetDir.findSubdirectory("model")
val targetDirNtwk = targetDir.findSubdirectory("network")
val targetDirVm = targetDir.findSubdirectory("view_model")
val targetDirUC = targetDir.findSubdirectory("use_case")
val targetDirRp = targetDir.findSubdirectory("repository")

if (targetDirMdl == null) return
generateModelFile(modelName, "$packageName.model",  targetDirMdl)

if (targetDirNtwk == null) return
generateRetrofitFile(modelName, packageName,  targetDirNtwk)
.
.
.
fun generateModelFile(modelName: String, packageName: String, targetDir: PsiDirectory) {
    WriteCommandAction.runWriteCommandAction(project) {
        val className = modelName

        // Check if file already exists in targetDir
        val existingFile = targetDir.findFile("$className.kt")
        if (existingFile != null) {
            println("File $className already exists. Skipping generation.")
            return@runWriteCommandAction
        }

        val content = """
            package $packageName

            data class $modelName(
                val id: Int,
                val name: String,
                val listData: List<String>
            )
        """.trimIndent()

        val file = PsiFileFactory.getInstance(project)
            .createFileFromText("$className.kt", content)

        targetDir.add(file)
    }
}
fun generateRetrofitFile(modelName: String, packageName: String, targetDir: PsiDirectory) {
    // ApiService
    WriteCommandAction.runWriteCommandAction(project) {
        // Check if file already exists in targetDir
        val existingFile = targetDir.findFile("$apiServiceName.kt")
        if (existingFile != null) {
            println("File $apiServiceName already exists. Skipping generation.")
            return@runWriteCommandAction
        }

        val content = """
            package $packageName.network
            import $packageName.model.$modelName
            import retrofit2.http.GET

            interface $apiServiceName {
                @GET("api/data/first")
                suspend fun getSingleData(): $modelName

                @GET("api/list")
                suspend fun getListData(): List<$modelName>

                @GET("api/data/{id}")
                suspend fun getDataById(id: Int): $modelName
            }
        """.trimIndent()

        val file = PsiFileFactory.getInstance(project)
            .createFileFromText("$apiServiceName.kt", content)

        targetDir.add(file)
    }

    // Retrofit Instance
    WriteCommandAction.runWriteCommandAction(project) {
        // Check if file already exists in targetDir
        val existingFile = targetDir.findFile("$retrofitInstance.kt")
        if (existingFile != null) {
            println("File $retrofitInstance already exists. Skipping generation.")
            return@runWriteCommandAction
        }

        val content = """
            package $packageName.network
            import retrofit2.Retrofit
            import retrofit2.converter.gson.GsonConverterFactory

            object $retrofitInstance {
                private const val BASE_URL = "YOUR_BASE_URL_HERE"

                val api: $apiServiceName by lazy {
                    Retrofit.Builder()
                        .baseUrl(BASE_URL)
                        .addConverterFactory(GsonConverterFactory.create())
                        .build()
                        .create($apiServiceName::class.java)
                }
            }
        """.trimIndent()

        val file = PsiFileFactory.getInstance(project)
            .createFileFromText("$retrofitInstance.kt", content)

        targetDir.add(file)
    }
}
See the other full function file generated in my Github here
4. After we create whole necessary classes, we want to amend as-is activity to ViewModel Implementation. in this case we use MainActivity.kt
fun findAndGetActivityFileInProject(activityName: String, project: Project): PsiFile? {
    val classes = PsiShortNamesCache.getInstance(project)
        .getClassesByName(activityName, GlobalSearchScope.projectScope(project))

    val activityClass = classes.firstOrNull() ?: return null
    val file = activityClass.containingFile ?: return null
    if (!file.name.endsWith(".kt")) return null

    return file
}
val psiFile = findAndGetActivityFileInProject(activity, project) ?: return
declareViewModelIntoActivity(psiFile, project, activity, packageName,
    "$packageName.network.$retrofitInstance",
    "$packageName.repository.${repository}Impl",
    "$packageName.use_case.${useCase}Impl" ,
    "$packageName.view_model.$viewModel")
While writing class, import, function, val, var, etc in .kt file, remember that indentation is matter. Put selective and exact indent position will show better result.
5. Last part, write some supporting libraries in build.gradle.kts such as:
"androidx.lifecycle:lifecycle-viewmodel-ktx:2.8.7",
"androidx.lifecycle:lifecycle-livedata-ktx:2.8.7",
"org.jetbrains.kotlinx:kotlinx-coroutines-android:1.8.1",
"com.squareup.retrofit2:retrofit:2.11.0",
"com.squareup.retrofit2:converter-gson:2.11.0"
Because we previously have built Retrofit Instance, Api Service and ViewModel class, we have to put it so when user use our plugin, just as easy as sync their android gradle (no need manually import).
First step, find build.gradle file and check whether they use Kotlin DSL version or Groovy DSL
fun addDependencyToGradle(project: Project) {
  val baseDir = project.baseDir
  val appDir = baseDir.findChild("app") ?: return

  val gradleFile = appDir.findChild("build.gradle.kts") ?: appDir.findChild("build.gradle") ?: return
  val isKtsFile = gradleFile.extension == "kts"
  .
  .
}

fun getListOfAdditionalGradle(): List<String> {
   return listOf(
       "androidx.lifecycle:lifecycle-viewmodel-ktx",
       "androidx.lifecycle:lifecycle-livedata-ktx",
       "org.jetbrains.kotlinx:kotlinx-coroutines-android",
       "com.squareup.retrofit2:retrofit",
       "com.squareup.retrofit2:converter-gson"
   )
}
fun getListOfAdditionalGradleVersion(): List<String> {
    return listOf(
        "2.8.7",
        "2.8.7",
        "1.8.1",
        "2.11.0",
        "2.11.0"
    )
}
fun formattingGradleGroovyOrKotlinDsl(isKts: Boolean, gradleName: String, gradleVer: String): String {
    return when (isKts) {
        true -> """
                implementation("$gradleName:$gradleVer")
            """.trimIndent()

        else -> """
                implementation "$gradleName:$gradleVer"
            """.trimIndent()
    }
}
Next step, find { (parentheses) symbol in dependencies section and write down exactly after { symbol.
fun addDependencyToGradle(project: Project) {
  .
  .
  WriteCommandAction.runWriteCommandAction(project) {
      val document = getInstance(project)
          .getDocument(psiFile) ?: return@runWriteCommandAction

      val text = document.text

      getListOfAdditionalGradle().mapIndexed { i, gradleFile ->
          if (text.contains(gradleFile)) {
             return@mapIndexed
          } else {
              if (i > 0) {
                  textToGenerate += "    "
              }
              textToGenerate += formattingGradleGroovyOrKotlinDsl(isKtsFile, gradleFile, gradleVer = getListOfAdditionalGradleVersion()[i])
              textToGenerate += "n"

              textToWrite += formattingGradleGroovyOrKotlinDsl(isKtsFile, gradleFile, gradleVer = getListOfAdditionalGradleVersion()[i])
              textToWrite += "n"
          }
      }

      // take "dependencies {" string as first starting point

      val dependenciesIndex = text.indexOf("dependencies {")

      if (dependenciesIndex != -1) {
          val insertIndex = text.indexOf("{", dependenciesIndex) + 1
          document.insertString(insertIndex, "n    $textToGenerate")
      }

      getInstance(project).commitDocument(document)
  }
  // Add Success Popup Dialog
}
12. Final part, open your plugin.xml
<idea-plugin>
    <id>com.android.kotlin.architecture</id>
    <name>Kotlin Android S.O.L.I.D Arch</name>
    <vendor url="https://mikkelofficial7.github.io">Mikkel Septiano</vendor>

    <description><![CDATA[
        Example of Android Kotlin <em>Clean Architecture</em>
        <br><br>
        We generate minimum setup of ViewModel, UseCase, and Repository automatically
        with additional support for Retrofit and Coroutine setup.
        <br><br>
        To use this tool feature, select View | Tool Windows | Generate S.O.L.I.D Architecture.
    ]]></description>

    <depends>com.intellij.modules.platform</depends>
    <depends>com.intellij.modules.java</depends>
    <extensions defaultExtensionNs="com.intellij">

    </extensions>
    <actions>
        <action id="com.android.kotlin.architecture.Main"
                class="com.android.kotlin.architecture.Main"
                text="Generate S.O.L.I.D Architecture">
            <add-to-group group-id="ToolsMenu" anchor="last"/>
        </action>
    </actions>
</idea-plugin>
in plugin.xml you can define plugin and personal info e.g author name, author website, plugin description, plugin text action (showed in Android Studio), etc
See the complete and full code reference in my Github here
Testing
Let say you have finished your plugin building and you want to test it and ensure everything work smooth,
Open terminal section and run ./gradlew runIde , Intellij will show Android Studio Emulator
Deploying
If you want to build it for production and deploy to Jetbrains Marketplace, follow these steps:
- Open build.gradle.kts and find this section:
intellijPlatform {
    create("AI", "2025.2.3.8") // Use this for zip building (production only)
    // local("/Applications/Android Studio.app") // Use this to test using Android Studio Emulator (debug only)
    .
    .
}
Replace local(“/Applications/Android Studio.app”) to create(“AI”, “2025.2.3.8”) to so it will provide released suitable Android Studio Version.
2. Build it into .zip file. Go to Gradle icon (elephant icon) in side tab and choose buildPlugin section.

3. Host your build result in build/distributions/your-plugin-name.zip folder location.
4. Open Jetbrains marketplace and create your own account.

5. Fill some form and upload your .zip file
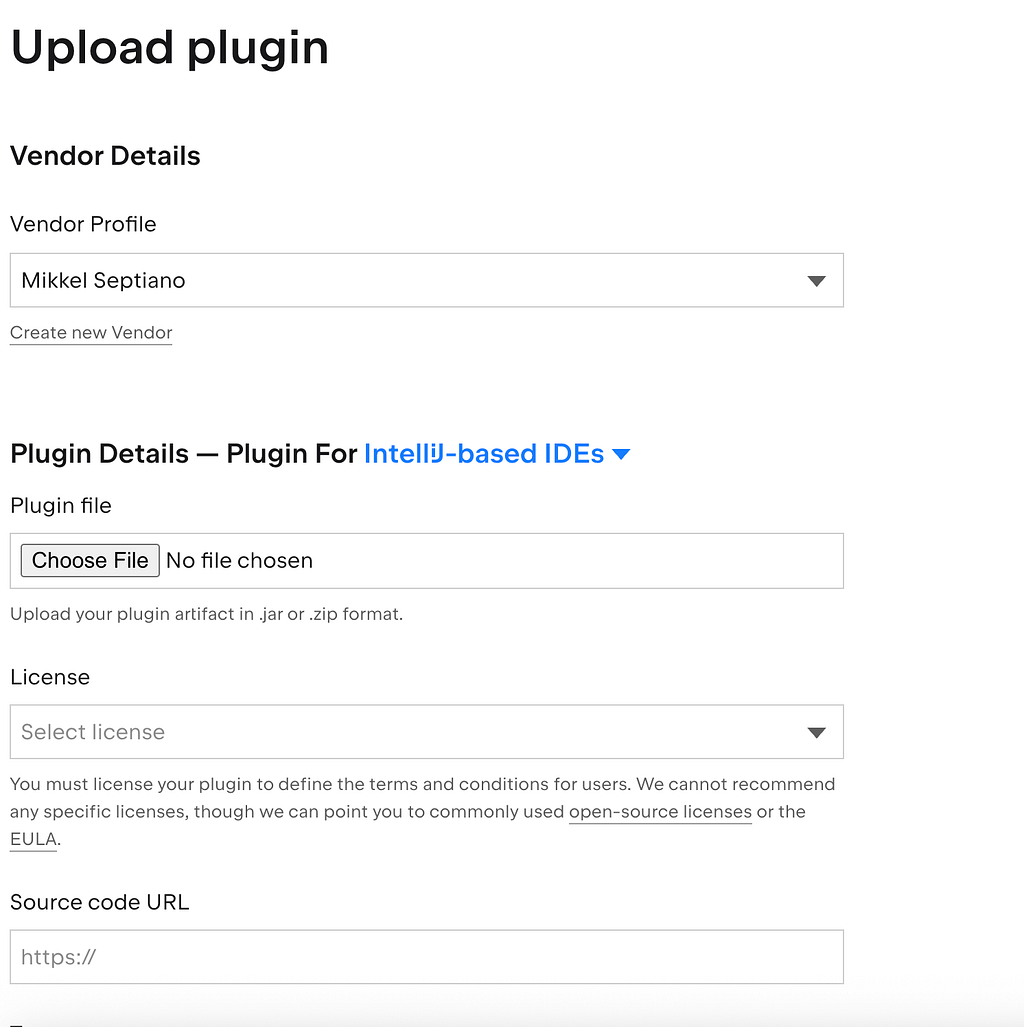
And that’s it! you already make a move by submitting your plugin.
P.s Don’t forget to try my plugin here and leave a 5 rating star and feedback there :)

See the complete and full code reference in my Github here
Getting Started of Building Your Clean Architecture Android Studio Plugin was originally published in ProAndroidDev on Medium, where people are continuing the conversation by highlighting and responding to this story.


This Post Has 0 Comments