
The Problem We’ve All Had at Least Once
You just released a new version of your app and someone reports a bug that wasn’t there in the previous release.
You need to compare the two versions. You need to build and debug both, ideally in parallel. What do you do?
Option A: You git stash, checkout the old branch, wait for Gradle to sync, debug, then switch back. Back and forth, losing context and breakpoints every time.
Option B: You clone the entire repository into another folder. It works, but you’re duplicating the full history, downloading dependencies from scratch, and managing two independent copies.
Option C: You use git worktree.
If you’ve never heard of worktree, this article will change the way you work.
What Is a Git Worktree
Every Git repository has a main worktree: it’s the folder where you see your files, make changes, and run builds. What most people don’t know is that Git allows you to create additional worktrees, each pointing to a different branch, but all connected to the same repository.
The concept is simple: a worktree is an additional working directory that shares the same .git object store as the original repository. Commits, branches, tags, stash — everything is shared. But each worktree has its own HEAD, its own index, and its own files, so you can work on them completely independently.
my-app/                        ← main worktree (release/10.1.7)
  .git/                        ← shared object store
  app/
  build.gradle.kts
  ...
my-app-compare/                ← secondary worktree (release/10.1.6)
  .git                         ← file (not a folder!) pointing to my-app/.git
  app/
  build.gradle.kts
  ...
The difference from a clone is significant: you’re not duplicating anything. There’s no second copy of the history, no second remote to manage. It’s the same repository, with two different windows open on two different branches.
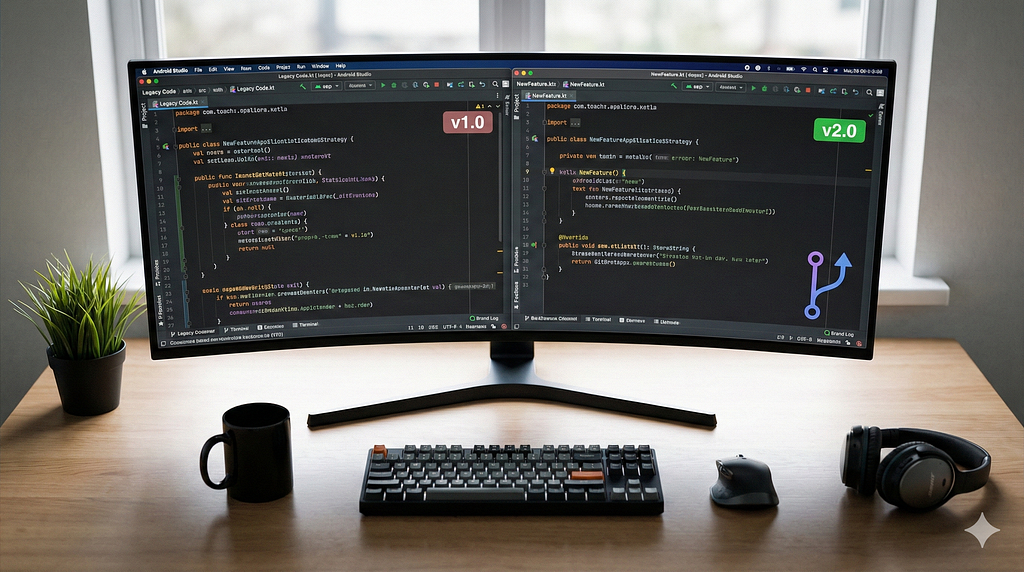
Hands-On: Comparing Two Versions of Your App
Let’s start from the concrete use case. You have your Android project open on release/10.1.7 and you want to open release/10.1.6 in another Android Studio instance.
Step 1: Create the Worktree
Open the terminal in your project root and run:
git worktree add ../my-app-compare release/10.1.6
This command does three things:
- Creates the folder ../my-app-compare next to your project
- Checks out the release/10.1.6 branch in that folder
- Registers the worktree in the repository
If you have a tag instead of a branch, you can use it as well. Git will create a worktree in detached HEAD state:
git worktree add ../my-app-compare v10.1.6
Heads up: Avoid using dots in the worktree folder name (e.g. my-app-10.1.6). Android Studio may reject it as an invalid project name.
Stick to simple names like my-app-compare or my-app-old.
Step 1.5: Copy Untracked Configuration Files
Here’s a gotcha that will bite you if you don’t see it coming: files in .gitignore don’t exist in the new worktree. Since worktrees only check out tracked files, anything that’s gitignored — like local.properties — won’t be there.
Without local.properties, Gradle won’t know where your SDK is, and any custom keys or credentials defined there will be missing. The build will fail, often with a misleading error that doesn’t immediately point to the real cause.
The fix is simple — copy over the untracked files your build needs:
# Copy local.properties (contains SDK path + any custom keys)
cp local.properties ../my-app-compare/
# If you have other gitignored config files, copy those too
# cp keystore.properties ../my-app-compare/
# cp signing.properties ../my-app-compare/
As a general rule: if your build depends on any file that lives in .gitignore, you’ll need to copy it manually into the worktree directory. This includes local.properties, credential files, .env files, and any local signing configurations.
Step 2: Open the Worktree in Android Studio
Launch a new instance of Android Studio:
- File → Open → select the ../my-app-compare folder
- Let Gradle sync
Now you have two Android Studio instances open: one on 10.1.7, the other on 10.1.6. You can build, set breakpoints, and debug both in parallel.
Tip: If you want to run both versions on the same device/emulator, make sure the two builds have a different applicationId, otherwise one will overwrite the other. If they share the same applicationId, use two different emulators or temporarily change the ID in one of the worktrees.
Step 3: Debug the Issue
With both instances open, you can:
- Run both versions on two emulators and compare behavior
- Use the Network Inspector to compare tracking payloads
- Set breakpoints at the same code location in both instances
- Use Logcat with identical filters to compare logs in real time
Step 4: Cleanup
When you’re done with the analysis, close the project in Android Studio and remove the worktree:
git worktree remove ../my-app-compare
If you deleted the folder manually without using the command, you can clean up orphaned references with:
git worktree prune
Essential Commands
Here’s the complete set of worktree commands you’ll need day to day:
# Create a worktree on an existing branch
git worktree add <path> <branch>
# Create a worktree with a new branch (based on current HEAD)
git worktree add -b <new-branch> <path>
# Create a worktree with a new branch based on a specific commit
git worktree add -b hotfix/tracking ../my-app-hotfix release/10.1.6
# List all active worktrees
git worktree list
# Remove a worktree
git worktree remove <path>
# Clean up references to manually deleted worktrees
git worktree prune
One constraint to remember: two worktrees cannot have the same branch checked out simultaneously. This makes sense because they share refs, and having the same branch in two working directories would create conflicts. If you need to work on the same branch, create a new branch from the point you’re interested in using the -b option.
Worktree vs the Alternatives
The most common alternative is cloning the repo into a second folder. It works, but you’re duplicating the entire history, the two repos are completely independent (no shared branches or stash), and there’s always the risk of accidentally pushing from the wrong one. Setup takes minutes instead of seconds, and you get a separate Gradle cache to warm up.
The other approach is the classic stash and checkout: you stash your current work, switch branches, debug, then switch back. It’s fast and doesn’t take extra disk space, but you can’t work in parallel. You lose your context every time you switch, and forgotten stashes or accidental merges are a real risk.
Git worktree sits in the sweet spot. It only takes seconds to set up, uses minimal disk space (just the working tree files, no duplicated history), and gives you full parallel work with two IDE instances. Branches, stash, and the entire history are shared across worktrees, which keeps things simple and reduces the chance of mistakes.
Conclusion
git worktree is one of those tools that once you discover it, you wonder how you ever lived without it. It’s native to Git (nothing to install), it’s fast, it takes up minimal disk space, and it solves a real problem that every Android developer faces regularly.
Next time someone tells you “it was working in the previous version,” you’ll know exactly what to do — and it’ll take you thirty seconds.
git worktree add ../compare release/10.1.6
Happy debugging.
Git Worktree: Run Two Branches in Parallel on Android Studio was originally published in ProAndroidDev on Medium, where people are continuing the conversation by highlighting and responding to this story.


This Post Has 0 Comments