
If you have been developing Android applications for a while, you are probably familiar with the concept of drawable resources. These are the images and icons that your application uses throughout its UI. Chances are, a good portion of them are PNG files sitting in your drawable-xxhdpi folder.
Now, PNG files are raster images. That means they are made up of pixels, and the more pixels you need (for higher density screens), the larger the file. Multiply that across every icon in your application, and you are carrying around a lot of dead weight. This has a direct impact on your application’s download size, install size, and ultimately, whether a user on a low-storage device decides to keep it or not.
The solution Android offers is the VectorDrawable — an XML format that describes shapes mathematically rather than as a grid of pixels. A single VectorDrawable scales perfectly to any screen density, and in most cases is a fraction of the size of the PNG it replaces.
⚠️ In this article, we deal mostly with simple, flat icons with clearly defined shapes. Complex images with gradients, anti-aliasing, or photographic content are not well-suited to vectorization in general, and will not produce clean results regardless of which tool you use.
One of my applications, LaundrySymbols, had a ton of PNG files to show the different laundry symbols found on clothes. Originally, I just imported these as PNG files and inside Google Play console, under the Monitor and improve → Android vitals → App size, I saw a suggestion to reduce the size of my application related to converting images.

Granted, the application size savings there aren’t crazy, but you know it as well as me, every bit helps.
In this article, we will first walk through how the process is done manually, step by step. After doing that, you will see that converting PNGs to VectorDrawables can be a tedious process so we will also look at how to automate the whole thing with a script for both Windows (Powershell) and Mac (bash).
Understanding the process
Android Studio does not support importing PNG files directly as vector assets. The Vector Asset Studio tool, which handles the conversion to VectorDrawable XML, only accepts SVG or PSD files as input. This means the very first thing you need to do is convert your PNG to an SVG.
There are several tools that can do this. One of the most popular is Inkscape. It is free, open source, and available on all platforms. The reason it is a good choice here is that it has a dedicated Trace Bitmap feature which analyses the pixel content of an image and generates vector paths from it – rather than just wrapping the raster image in an SVG container, which would be useless for our purposes.
✋ At the time of writing this article, I was using Inkscape v1.4.3
Here is how to use it:
- When you open Inkscape you will have an option to open your file
- After choosing it, a window will pop up with importing options
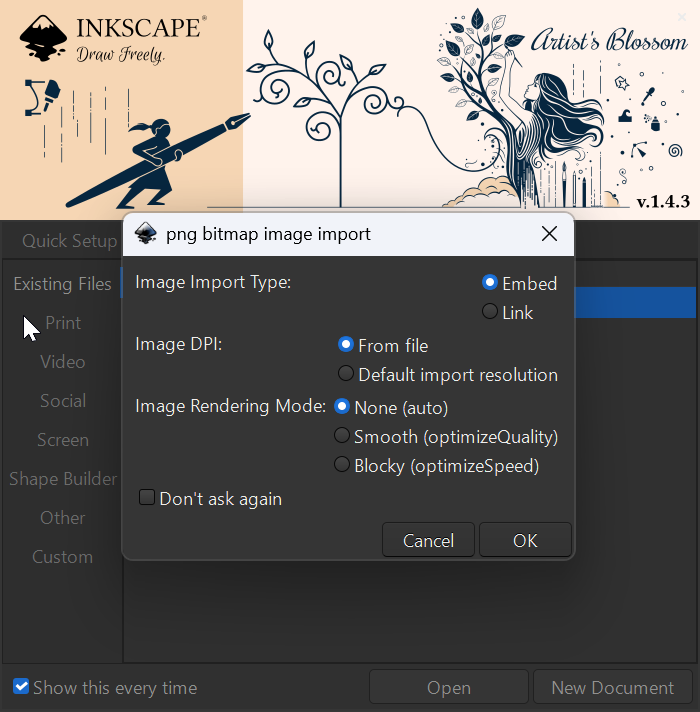
3. With the image selected, go to Path → Trace Bitmap

4. In the dialog, choose your preferred tracing method. For flat icons, Brightness cutoff works well. Adjust the threshold until the preview looks right
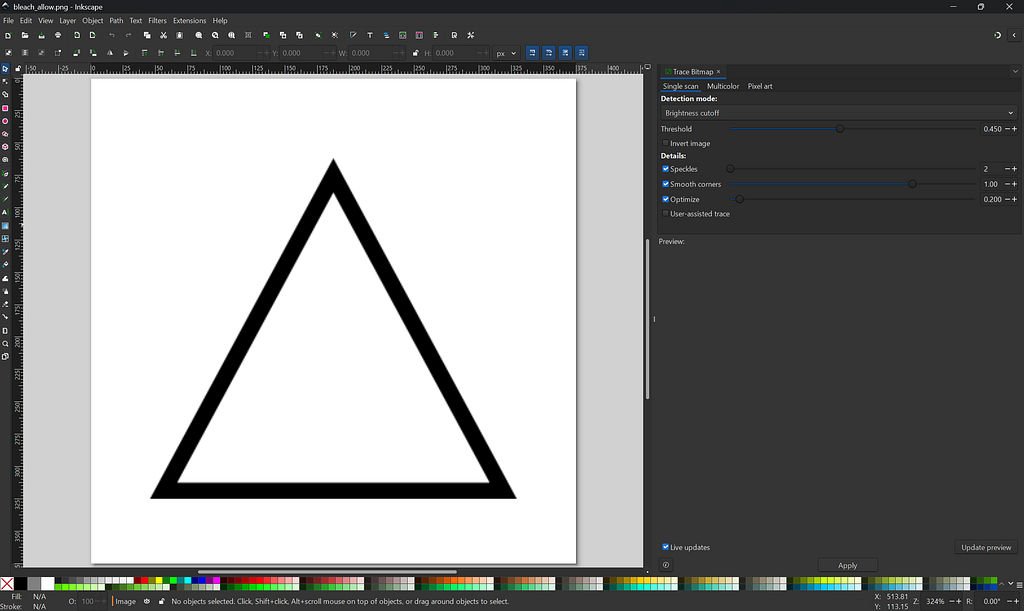
5. Click Apply (at the bottom) to generate the vector paths
6. Now, you will have two layers in your image, the top one is the generated path and the bottom one is the original image. In order to delete the bottom layer, you will need to move the top one

7. Export the result as a plain SVG via File → Save As and choose Plain SVG as the format
If Inkscape feels heavy for this task, there are also free online tools that can handle the PNG-to-SVG conversion in a browser: FreeConvert.com, Picsvg.com, and png2svg.com
Now that you have an SVG file, you can bring it into Android Studio using Vector Asset Studio:
- Right-click on the res folder in your project and select New → Vector Asset
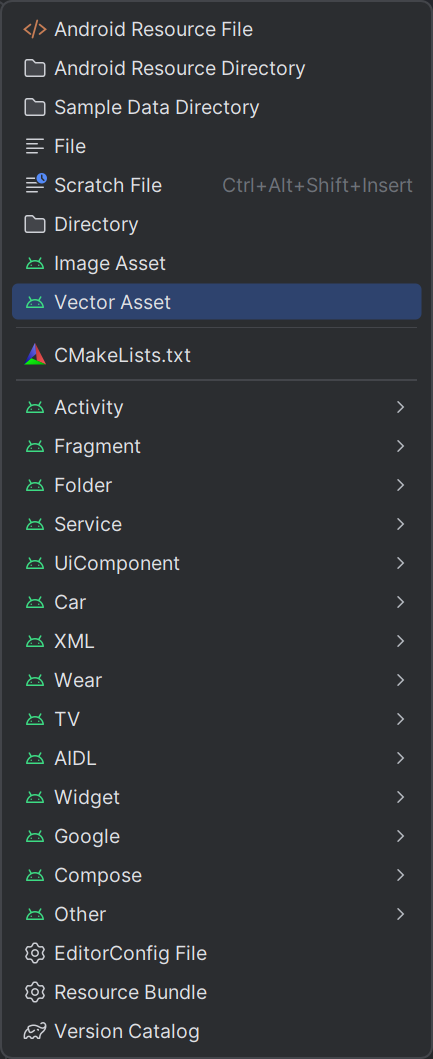
- In the dialog that opens, change the Asset Type from Clip Art to Local file (SVG, PSD)
- Click the file icon next to the Path field and navigate to your SVG file
- Adjust the name and size as needed
- Click Next, then Finish — Android Studio will generate the VectorDrawable XML and place it in your drawable folder
- Don’t forget to remove your original PNG file
This is 2026 (Seven)
As you may have guessed, I wasn’t going to go through this entire process for every PNG file I had. I knew there was a way I could automate it and using AI, I built a script which did all the work. I started the process of automating this flow by talking to both Claude and ChatGPT to understand what tools were available for each stage of the process.
First we have to convert the PNG image to an SVG. In order to do this we will use ImageMagick – an open source image processing tool available on every platform. It was chosen because it can reliably preprocess a PNG from the command line: flattening transparency, converting to greyscale, and thresholding to strict black and white in a single command. This produces a clean PBM (Portable Bitmap) file.
Now that we have a Bitmap, we need to convert it to an SVG. To do this, we will use Potrace – a dedicated bitmap-to-vector tracing tool that takes that PBM and produces a proper SVG with mathematically described paths. Potrace was chosen over alternatives because it is lightweight, scriptable, produces clean output for the kind of flat icon shapes common in Android apps, and has been actively maintained for over two decades.
The last step is to convert this SVG into a VectorDrawable. This is where things got complicated. There is no generally available CLI tool that converts SVG files to Android VectorDrawable XML in a way that is guaranteed to be compatible. The initial suggestions made by Claude/ChatGPT were either deprecated, had their repositories taken down, or simply did not produce valid output. After several conversations the solution I landed on is vd-tool — a standalone binary that packages the exact same conversion engine that Android Studio uses internally in Vector Asset Studio. Since it comes directly from Android’s own toolchain, compatibility is not a concern.
The script handles the entire pipeline — from PNG to Android-ready VectorDrawable XML — in one run. You point it at your project, and it processes every PNG in your drawable-xxhdpi folder and drops the resulting .xml files directly into your drawable folder.
✋ The commands below are for Windows
Before running the script, you will need all three tools installed on your machine:
- ImageMagick – winget install ImageMagick.ImageMagick
- Potrace – download the Windows binary from http://potrace.sourceforge.net/ and add it to your PATH
- vd-tool – download the release zip from https://github.com/rharter/vd-tool/releases, extract it, and update the $vdToolPath variable in the script to point at vd-tool.bat
- Java – vd-tool is JVM-based. If you already have Android Studio installed, the script will automatically find its bundled JDK. Otherwise: winget install Microsoft.OpenJDK.21
You will also need to allow PowerShell to run local scripts, if you haven’t already:
Set-ExecutionPolicy -Scope CurrentUser -ExecutionPolicy RemoteSigned
How the script works
The conversion happens in three stages for each file:
Stage 1 – PNG → PBM
ImageMagick flattens the PNG onto a white background, converts it to greyscale, and thresholds it to strict black and white. The result is a PBM file — a binary bitmap that Potrace can work with.
Stage 2 – PBM → SVG
Potrace traces the black shapes in the bitmap and produces a clean, mathematically described SVG. This is where the raster-to-vector conversion happens.
Stage 3 – SVG → VectorDrawable XML
vd-tool converts the SVG into an Android VectorDrawable. This is the same conversion engine that Android Studio uses internally in Vector Asset Studio, just extracted into a standalone binary.
After vd-tool runs, the script does one additional post-processing step: it inspects each generated XML and adds android:fillType=”evenOdd” to any path that contains multiple subpaths. This is necessary because Potrace uses the SVG even-odd fill rule to represent shapes with holes (like a circle with a cutout), but Android’s <vector> renderer defaults to the non-zero winding rule — without this fix, those transparent holes fill solid black instead.
Place the script at the root of your Android project and run it from there. It expects your PNG source files to be in app/src/main/res/drawable-xxhdpi and will write the output to app/src/main/res/drawable:
https://medium.com/media/237f7fe809647dcb9243475e7528e3fb/href
If you want to verify the output before committing, open the generated .xml file in Android Studio. The preview in the editor will show you exactly how it will render.
🍎In case you wondered, there is also a MacOS version of this script to use
Conclusions
It is worth mentioning that getting to a working script did not happen in one shot. It took several iterations to iron out the issues – handling edge cases in the image conversion, resolving a Java runtime dependency for vd-tool, and diagnosing a subtle rendering bug in the generated XML where shapes were filling solid black instead of rendering with transparent holes. If you find you need to alter the script based on your own personal needs, it is already structured in a way that will be easy to do so.
The shift from PNG to VectorDrawable is one of those improvements that pays dividends for the lifetime of your application – smaller downloads, sharper assets on high-density screens, and one fewer set of density-specific resource folders to maintain. A script that handles the whole thing in one run makes the cost of that migration essentially zero.
If you are interested in reading other articles I have written, you can find them here:
How I Shrunk My Android App Size by Converting PNGs to Vector Drawables was originally published in ProAndroidDev on Medium, where people are continuing the conversation by highlighting and responding to this story.


This Post Has 0 Comments