
If I asked you how many ways you know to draw a glowing rounded-rectangle border in Jetpack Compose, what would your answer be? One? Two? Maybe three? I started with the same assumption, then ended up exploring a whole sequence of approaches to solve what first looked like a very small drawing task.
Task Definition
- grow to its full size on press, then shrink back and disappear on release
- support a rectangular shape with rounded corners
- keep the content area transparent, if possible
- be drawn outside the composable bounds the modifier is applied to
- allow stronger glow intensity and alpha than the classic Android shadow
- ideally render both a thin contour stroke and an outer glowing halo in one modifier, in a single effect pass
0. PNG border
API support: All API levels
I would not use this as the main solution, but it is still a valid proof of concept.
The idea is simple: prepare two PNG/WebP images, one for the idle state and one for the active state, then switch between them on press, wrapped in the Crossfade composable.
So if you use this approach, ask your designer to make the center transparent from the start. Otherwise, you will have to clear the middle area in code, like I did in this example
Apply a small scale and a negative offset to the Image modifier to make the border extend outside the composable bounds.
This approach should not be underestimated, because it moves part of the complexity to the designer side and gives developers more time to focus on business tasks.
1. Multi-Layer Halo
API support: All API levels
The core idea is simple: instead of using real blur, the glow is faked by drawing the same rounded rectangle many times, expanding it layer by layer and fading each outer stroke.
Getting outside the composable bounds is also straightforward here. Since drawBehind operates in the drawing phase rather than the layout phase, it can paint beyond the composable’s measured size. In practice,
that means moving the shape’s topLeft into negative coordinates and drawing it larger than the original box.
this.drawBehind {
    val layers = 25

    repeat(layers) { index ->
     ...

        drawRoundRect(
        ...
        )
    }
In practice, I would not consider this a strong production option. It works more as a proof of concept that this kind of glow can be approximated without blur or shaders.
To get a really smooth visual result, the number of layers has to grow roughly with the border thickness. In other words, the thicker the halo gets, the more stacked strokes you need to keep the gradient from
looking stepped. That quickly makes the approach expensive and visually inefficient.
So the only case where it can reasonably compete with other techniques at the same performance budget is a very thin border, where only a small number of layers is needed. Once the glow becomes wider, the method
stops scaling well both visually and technically.
2. BlurMaskFilter: A Classic Android Glow
BlurMaskFilter has been part of Android since API 1. But once Android moved to hardware-accelerated rendering starting from API 11, mask filters were no longer part of the most reliable path. So on older devices, expect surprises.

This time the glow is no longer faked with many strokes. Instead, the border is drawn once as a real outline, and the softness comes from BlurMaskFilter applied to the native paint.
val shadowPaint = Paint().apply {
    asFrameworkPaint().apply {
        ...
        maskFilter = BlurMaskFilter(blurRadiusPx, BlurMaskFilter.Blur.NORMAL)
    }
}

onDrawWithContent {
    drawContent()
    clipPath(path, ClipOp.Difference) {
        drawIntoCanvas { canvas ->
            canvas.drawPath(path, shadowPaint)
        }
    }
}
In this approach, the border extends beyond the composable mainly because it is drawn as a stroke pass. A stroked outline is centered on the path itself, so part of its width naturally falls outside the original
contour. After that, BlurMaskFilter spreads those pixels even further outward, turning the stroke into a soft halo.
This is probably the most familiar approach for this kind of glow effect on Android.
3. RenderEffect Blur
This approach requires Android 12 (API 31) or higher.
The solution here is to draw the glow in a separate layer and then scale that layer with graphicsLayer.scaleX and graphicsLayer.scaleY. Blur is applied through RenderEffect, which is conceptually the same kind of mechanism the blur() modifier relies on under the hood. As a result, the halo visually grows outside the composable.
val blurEffect = RenderEffect.createBlurEffect(…).asComposeRenderEffect()
...
Modifier.graphicsLayer {
  scaleX = …
  scaleY = …
  renderEffect = blurEffect
}
The main limitation of this approach is that the blur cannot be confined strictly to the outer border area. Once RenderEffect is applied, it affects the entire layer output, so producing a clean outside-only glow with transparent inner cutout is not possible in the same pass.
There is also a second issue: if the content is placed in that same layer, it becomes affected by the effect as well. To avoid that, the implementation uses two stacked Box layers. The first one draws the blurred glow, while the second one sits above it as a regular box with any solid background and the content.
The thin border is drawn separately. It is placed before the graphicsLayer, so it does not get blurred or scaled together with the glow. Because of that, it stays clear and preserves the shape of the rectangle.
In practice, I would not use this approach. Blur is a much better fit for whole-layer effects than for a local border around a specific shape. Here it can be made to work, but only with extra layering and structural compromises.
4. ShadowLayer: The Old Shadow API as a Border Effect
API support: Android API 1+, but practical behavior depends more on the rendering pipeline than on API availability alone but on older devices, expect surprises.
The trick here is to let Paint.setShadowLayer() do most of the work. Instead of building the glow manually, the outline is drawn as a path, and the shadow layer turns it into a soft halo around the shape.
The problem is that opacity control here is limited. This API was designed for shadows, and shadows in Android are not really meant to look highly saturated. Because of that, the result remains quite transparent
and does not feel like a strong glow.
The workaround here is to draw the same path multiple times. A single shadow pass looks too transparent, so repeated passes are used to build up a denser glow.
 onDrawWithContent {
      clipPath(path, ClipOp.Difference) {
          drawIntoCanvas { canvas ->
              repeat(passes) {
                  canvas.drawPath(path, shadowPaint)
              }
          }
      }
      drawContent()
  }
In other words, the visual density does not come from one strong shadow, but from several repeated shadow passes stacked on top of each other.
Drawing outside the composable here comes from the API out of the box.
One clear advantage is that this approach works with a Path, so it is not limited to rectangular shapes. In principle, it can be used with any custom shape that can be drawn as a path. Another nice detail is that it naturally leaves a thin visible line near the edge of the composable, which helps preserve the outline of the shape
In practice, I would not use this approach. It feels like a workaround, because it relies on drawing the same path multiple times just to build up enough visible glow.
5. Gradient Brushes: Building a Glow from Parts
API support: All API levels
This approach constructs the border from separate gradient pieces. The straight edges are drawn with linear gradients, while the rounded corners are drawn with radial gradients, then mirrored around the rectangle to assemble the full halo.
The downside is that drawWithCache does not really save us here. The brushes still depend on the current halo width, and the corner gradient also depends on the shape ratio, so both have to be recalculated during animation. A more performance-oriented alternative would be to always draw the halo at its maximum width and animate only its alpha from 0 to 1. The animation would look quite similar, but the rendering would be cheaper.
But this solution uses a true halo-width animation. The optimization is that only one radial brush is created for the corners and reused four times through transforms, while one linear brush is used for all side gradients.
The thin stroke is also handled with a small optimization: it remains bright while the halo is still expanded, not only while the finger is down. This avoids extra redraw work during tap spam.
Going outside the composable is fully manual. The gradients are drawn beyond the original bounds, then reused for the other sides and corners through translate, scale, and rotate.
Despite its complexity, I would still consider this approach for real use. Its behavior is predictable, and it remains a practical option for older devices as well.
6. AGSL border
Android 13+, API 33

This way is different from the previous ones. Here the border is no longer built from many drawing passes, blur tricks, or gradient parts. Instead, the whole effect is described directly inside one AGSL hader. That includes both parts of the border:
- the thin contour near the shape edge
- the outer halo that fades away with distance
So instead of combining several drawing techniques, we describe the full border in one shader and let it decide how strong the glow should be at every pixel.
In this implementation, the same AGSL shader is used in two different ways.
6.1 AGSL via RenderEffect
In the first version, the shader is attached through RenderEffect. This makes it behave more like a post-processing effect applied to the composable layer.
6.2 AGSL via Canvas Paint
In the second version, the same shader is attached directly to a native Paint object and drawn through canvas.
So the visual logic stays the same, but the execution path changes. Instead of passing through RenderEffect, the shader is used like a normal paint shader during canvas drawing.
The important point is that these are not two different border designs. It is the same border, the same shader, and the same visual model. The only difference is how that shader is executed.
In both AGSL versions, transparency comes from the shader itself: it generates alpha only outside the rounded rectangle. The difference is in composition. In the RenderEffect path, the shader reads the source
layer and blends the halo behind it. In the Canvas Paint path, the shader draws the halo on a transparent base first, and the content is drawn on top afterward.
So yes, AGSL handles this task very well. But for a simple glowing border like this, I would not personally use it. I would rather keep AGSL for something more crazy and visually outstanding, which is exactly what the next chapter is about.
7. Fire Shader: Turning the Border into a Crazy Ice-Fire Effect
Android 13+, API 33
This is more of a bonus chapter. It is no longer about the original border requirements, and not really about finding the cleanest implementation of a glowing rounded rectangle. It is simply a demonstration of how far AGSL can be pushed once the border stops being just a border and becomes a full visual effect.
I first built this shader in GLSL on ShaderToy. That made the iteration process much faster, because parameters could be changed in real time and the visual result was visible immediately, without rebuilding the
Android app after every small tweak. Only after that did I port the effect to AGSL.
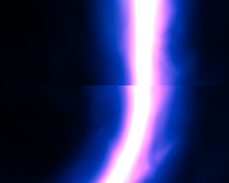
One of the practical problems was the join on the right side, where the border path wraps from end back to start. The solution was to add a small overlap area where the tail fades out while the head fades in, making the transition much less visible.
Thanks
How Many Ways Do You Know to Draw a Glowing Border in Jetpack Compose? was originally published in ProAndroidDev on Medium, where people are continuing the conversation by highlighting and responding to this story.


This Post Has 0 Comments